Deploying and running a redpesk image on a Raspberry Pi
The Raspberry Pi is a small computer that is ideal for learning computing and computer languages.
The redpesk project supports images for the
Raspberry Pi 3, Raspberry PI CM3 IO3 and the Raspberry Pi 4
boards using the aarch64 architecture.
Each of these boards comes in a variety of models. See the Raspberry Pi Product Page for more information.
This topic details how to copy a redpesk disk image on an sdcard.
Download images
See the Download Images section
Download the aarch64 image from the command line
Create a directory to download the image:
mkdir ~/redpeskimage
cd ~/redpeskimage
Then download the latest redpesk OS image with this command:
wget -r -nd -nc --no-parent -A "redpesk*smack*" 'https://download.redpesk.bzh/redpesk-lts/batz-2.0-update/images/smack/minimal/aarch64/rpi/'
Control the image integrity
Before doing anything, please control the integrity of the downloaded redpesk image. Example:
sha256sum -c redpesk*.tar.xz.sha256
redpesk*x86_64*.tar.xz: OK
Copying the image on your sdcard
Plug your sdcard and Find it (be sure it is unmounted)
Copy the correct device path thanks to the command below. It should be a hotplug device.
lsblk -dli -o PATH,VENDOR,TYPE,HOTPLUG,MODEL

DEVICE_TO_COPY='/dev/<hotplug_device>' #in the example it is /dev/sdc
Example:
$ lsblk -dli -o PATH,VENDOR,TYPE,HOTPLUG,MODEL
PATH         VENDOR   TYPE HOTPLUG MODEL
/dev/sda     ATA      disk       0 WDC_WD10SPZX-08Z10
/dev/sdc     TS-RDF5  disk       1 SD_Transcend #MYSDCARD
/dev/nvme0n1          disk       0 LITEON T11 512
DEVICE_TO_COPY=/dev/sdc
Or if only one device is hotpluggable on your computer:
# need jq
DEVICE_TO_COPY=$(lsblk -dlJ -o PATH,VENDOR,TYPE,HOTPLUG,MODEL | jq -r '.blockdevices[] | select(.hotplug == true).path')
echo $DEVICE_TO_COPY
Umount if needed
lsblk $DEVICE_TO_COPY
# need to umount each partition
sudo umount <part*>
Example:
$ lsblk $DEVICE_TO_COPY
NAME   MAJ:MIN RM  SIZE RO TYPE MOUNTPOINT
sdc      8:16   1 14,9G  0 disk
├─sdc1   8:17   1  500M  0 part /run/media/iotbzh/boot
├─sdc2   8:18   1  500M  0 part /run/media/iotbzh/config
├─sdc3   8:19   1  500M  0 part /run/media/iotbzh/recovery
├─sdc4   8:20   1    1K  0 part
├─sdc5   8:21   1  3,4G  0 part /run/media/iotbzh/rootfs
└─sdc6   8:22   1    2G  0 part /run/media/iotbzh/data
$ sudo umount ${DEVICE_TO_COPY}*
umount: /dev/sdc: not mounted.         --> Warning message to ignore
umount: /dev/sdc4: not mounted.        --> Warning message to ignore
Flash sdcard
Prerequisites: device is plugged in, found, unmounted
- Extract the image first
tar xJf redpesk*.tar.xz - Flash it using
ddsudo dd if="Redpesk-OS.img" of=$DEVICE_TO_COPY bs=4M status=progress - Or using bmaptool
sudo bmaptool copy "Redpesk-OS.img" $DEVICE_TO_COPY
TIPS: Once your are used to flash your image, you could do it much faster in one single step using
bmaptoollike this:sudo bmaptool copy "https://download.redpesk.bzh/redpesk-lts/batz-2.0-update/images/smack/minimal/aarch64/rpi/image.raw.tar.xz" $DEVICE_TO_COPYThis will download, control integrity and flash the latest redpesk OS image on your device in one uniq step.
Boot the Raspberry Pi
For more detail see: Setting up your raspberrypi
Prerequisites
- sdcard copied and plugged into the Raspberry Pi
- ethernet cable plugged in
- usb to uart adapter plugged on gpio14/15 (Console enabled by default on GPIO14/15)
Power on the Raspberry Pi
Just start the Pi and wait for it to boot.
NOTE: Default root password is
root.
Connect to the board over SSH
It needs an ethernet cable plugged into the board, and retrieving its ip.
- User:
root - Password:
root
Getting the Raspberry Pi IP address
# on rpi
ip -br a
# on your computer
ssh root@<raspberry_pi-IP_address>
Installing a package
See this section for installing and starting helloworld-binding: Application deployment
Debugging
When things go wrong, you can take steps to debug your Raspberry Pi. For debugging, you need a 3.3 Volt USB Serial cable to facilitate communication between your Raspberry Pi board and your build host.
CAUTION: No warranty is provided using the following procedure. Plugging in the serial cable on the wrong board GPIO/connector could damage your board, the host or both ! Pay particular attention to the colors of your cable as they could vary depending on the vendor.
NOTE: If you are using a USB console cable from Adafruit, see “Adafruit’s Raspberry Pi Lesson 5” for connection information.
Use the following steps, which assume you are using an Olimex cable (the previously mentioned Adafruit cable above does not have a blue lead in particular, adapt according to the document above). You can reference the following diagram for information on the following steps:
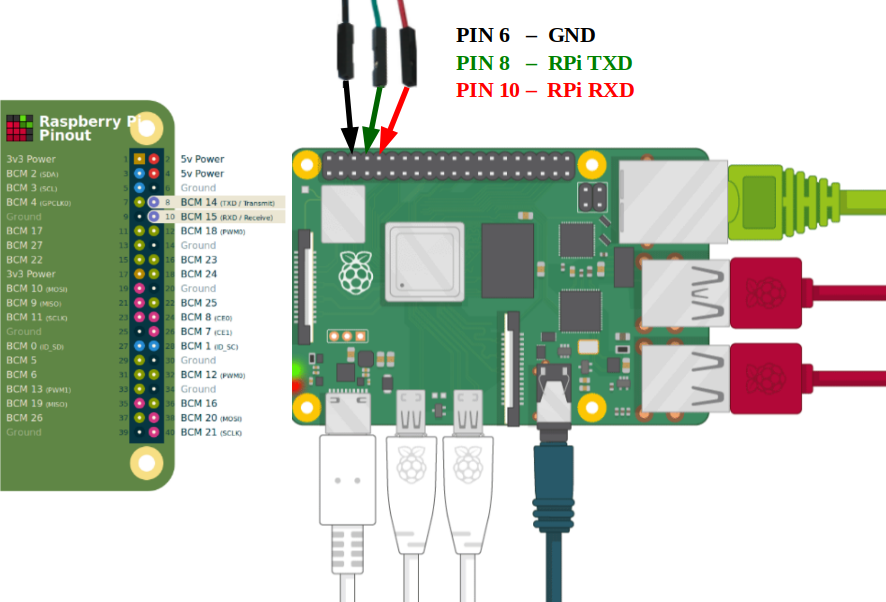
-
Connect the serial cable leads to the Universal Asynchronous Receiver-Transmitter (UART) connection on your Raspberry Pi board. Do not connect the USB side of the cable to your build host at this time.
-
Connect the host USB-to-UART cable’s BLACK wire to pin 6 of the RPi (i.e. Ground).
-
Connect the host USB-to-UART cable’s GREEN RX line to pin 8 of the RPi (i.e. GPIO14=TXD).
-
Connect the host USB-to-UART cable’s RED TX line to pin 10 of the RPi (i.e. GPIO15=RXD).
-
Plug the USB connector of the cable into your build host’s USB port.
-
Use your favorite tool for serial communication between your build host and your Raspberry Pi. For example, if your build host is a native Linux machine (e.g. Ubuntu) you could use
screenas follows from a terminal on the build host:$ sudo screen /dev/ttyUSB0 115200