Getting started for Developer
Access
The developer has the following access:
- Dashboard: contains the bookmarked projects and applications, build and test results
- Projects: contains the list of projects
- Applications: contains the list of applications
- Images: contains the list of images
- Tests: contains test results
- Teams: contains public and private teams
- Configuration: contains the look and feel of the web UI
How to create your project
Developers, as managers, can create their projects.
There are 3 types of projects :
- standard: use to develop applications that are part of a same project and consequently released and deployed from the same repository (see project releasing process for more details)
- container: use to develop applications that will be run in a redpak container (see Containers management chapter for more details)
- image: use to create and build custom redpesk images that you can boot on your target (physical hardware board or virtual board) (see Images management) chapter for more details)
This getting started will only detail below how to create and manage standard project and applications but note that details about of type of projects can be found in
redpesk factorypart of the documentation.
How to create a standard project
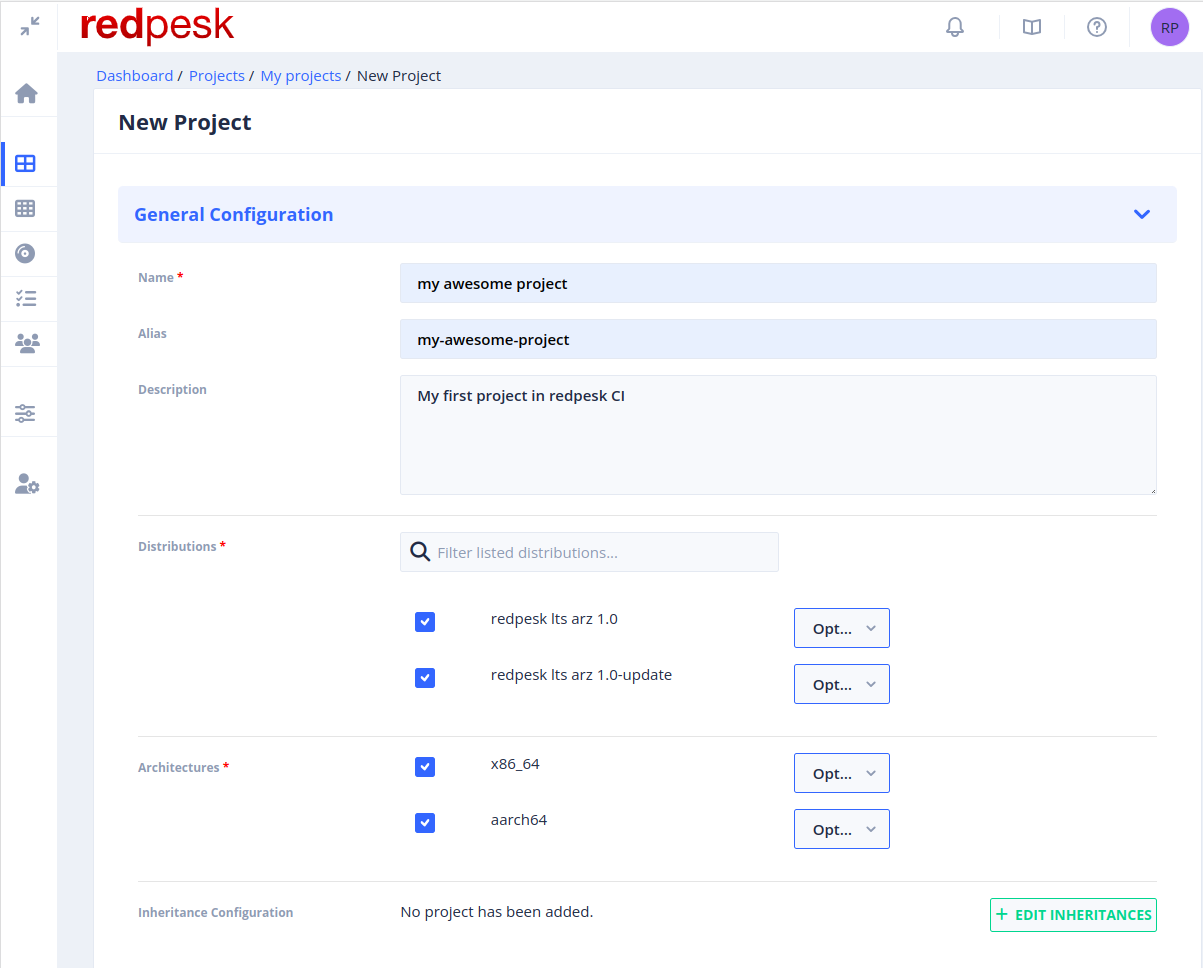
First, browse to redpesk web UI dashboard view, and click on Projects in the menu, then click on the plus icon to create a new project.
To create your first project, you will have to name it. Example: My awesome project. However, the description and the slug are optional (slug is based on the name).
If you wish to add an inheritance to your project, and if an inheritance option is available, select one or several inheritances. However, for the moment, multiple project is supported but not ready yet.
If you choose a project inheritance, the architectures and distributions will be automatically selected depending on the inheritance.
Inside the project, you can find one application already created, containing all the configurations set, like the architecture, and the distribution.
Depending on the project configuration, it might be possible to add optional or mandatory options (for the distributions and architectures) to the project. If the settings are set as mandatory by the manager however, it will not be possible to modify them.
How to create your application
Unlike projects, when an application is added inside a project, the application will depend on the project’s configuration.
Clicking on the project details, and applications tab inside the project, it is possible to find an example of an application called “helloworld-binding”, which can be found here: helloworld-binding
To add an application, add it inside a given project.
In order to create the application, you must provide a name, which basically corresponds to how your application is named within the redpesk environment. Moreover, you have to set the package name of your application, corresponding to how you want your package to be named when installed on a target. The package must be named using only ASCII characters. Such as the project, you can provide a description to your application.
The redpesk application can be seen as a git project, with as much branch as you wish. This feature will not be described here as it is a more advanced concept. You can find a brief description (in chapter Concepts and terminology) of the features coming along with branches in your application, and there a more in depth description for you to master application branches.
You can choose the name of your first application branch during the application creation by setting it under the field Default package branch. By default this value is set to main.
According to how you want your package to be built, your application might gathered the following types of files:
- Main application source, this is where the application code can be found. It is basically an archive of your source repository, that redpesk can automatically generate if you set your repository URL in the application settings, under the field
Source URL. Coming along with the Source URL, the fieldSource revisionis there for you to specified which git reference you want your application sources to be generated from (Branch/Tag/SHA). When no Source revision is given, the default repository branch pointed by Source URL is taken. - Additional application sources or patches, can be added in your application by uploading them into the application file manager.
- Application spec file, corresponds to the package receipt. It is responsible for the way your application sources are patched/built/prepared for target installation. More information regarding spec files are given in the next part of the documentation.
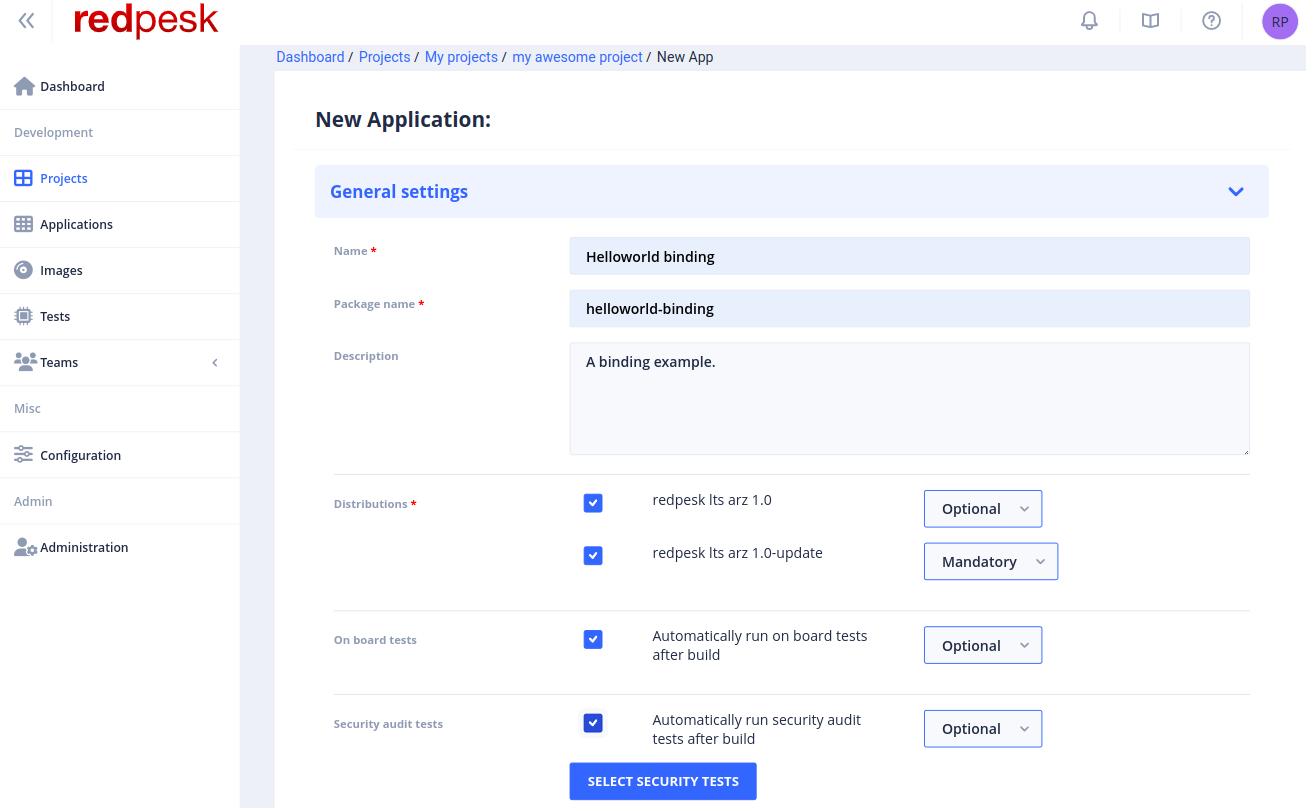
The spec file URL from the helloworld-binding example can be found here: Spec File repo
Spec file configuration
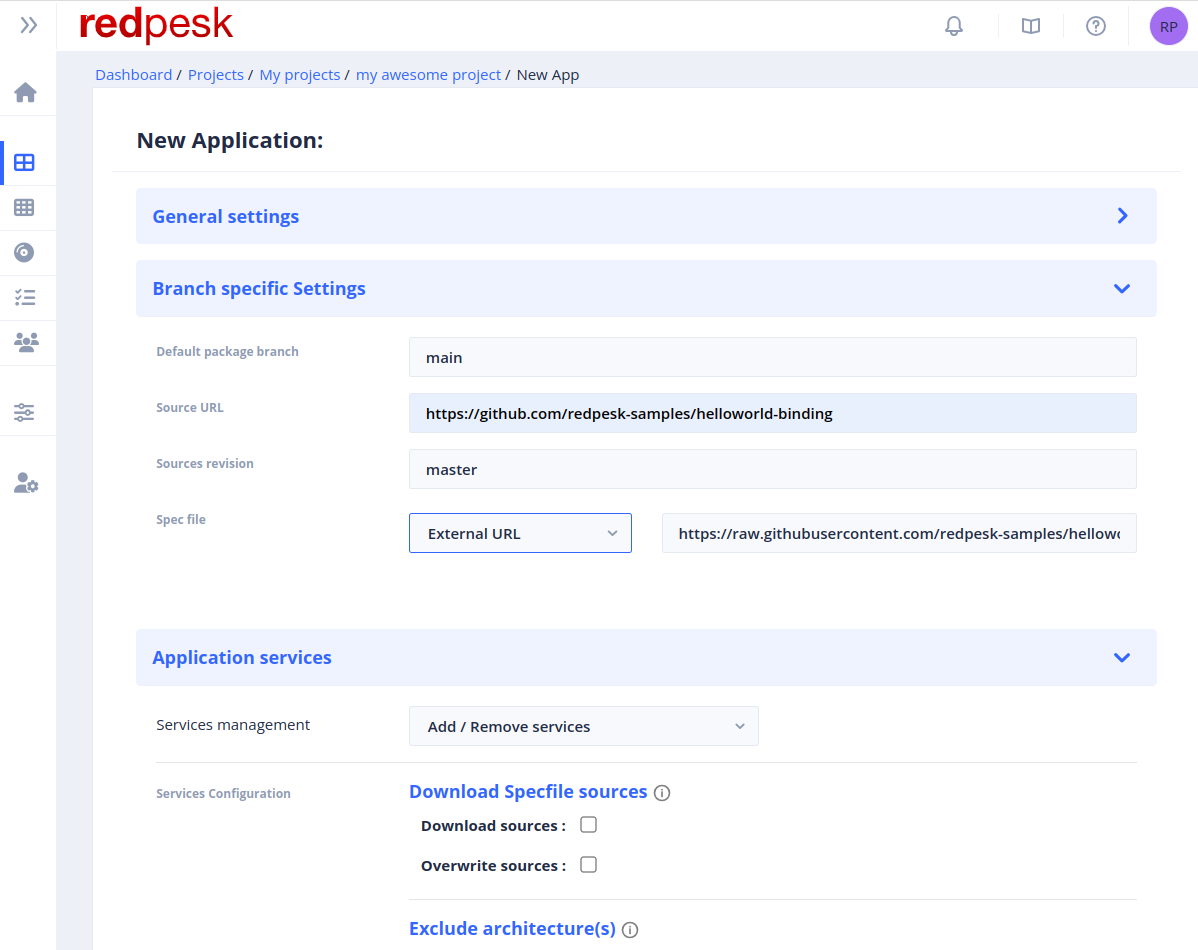
The spec file can be provided by 3 different methods:
-
spec file inside the source repository : provide again the source url and eventually the sub-directory where the spec file is located
-
spec file in another git repository : provides other git repository url and eventually the sub-directory where the spec file is located
-
spec file hosted by the redpesk infrastructure : redpesk provides a spec file editor. Spec file is managed and versioned inside redpesk infrastructure. User can use file editor integrated by web UI to potentially update spec file content. When the spec file is submitted, a preview of the changes are shown, this means you can see all the modifications which have been made in the file.
You can find some information about how to write a spec file, here :
SPEC file development
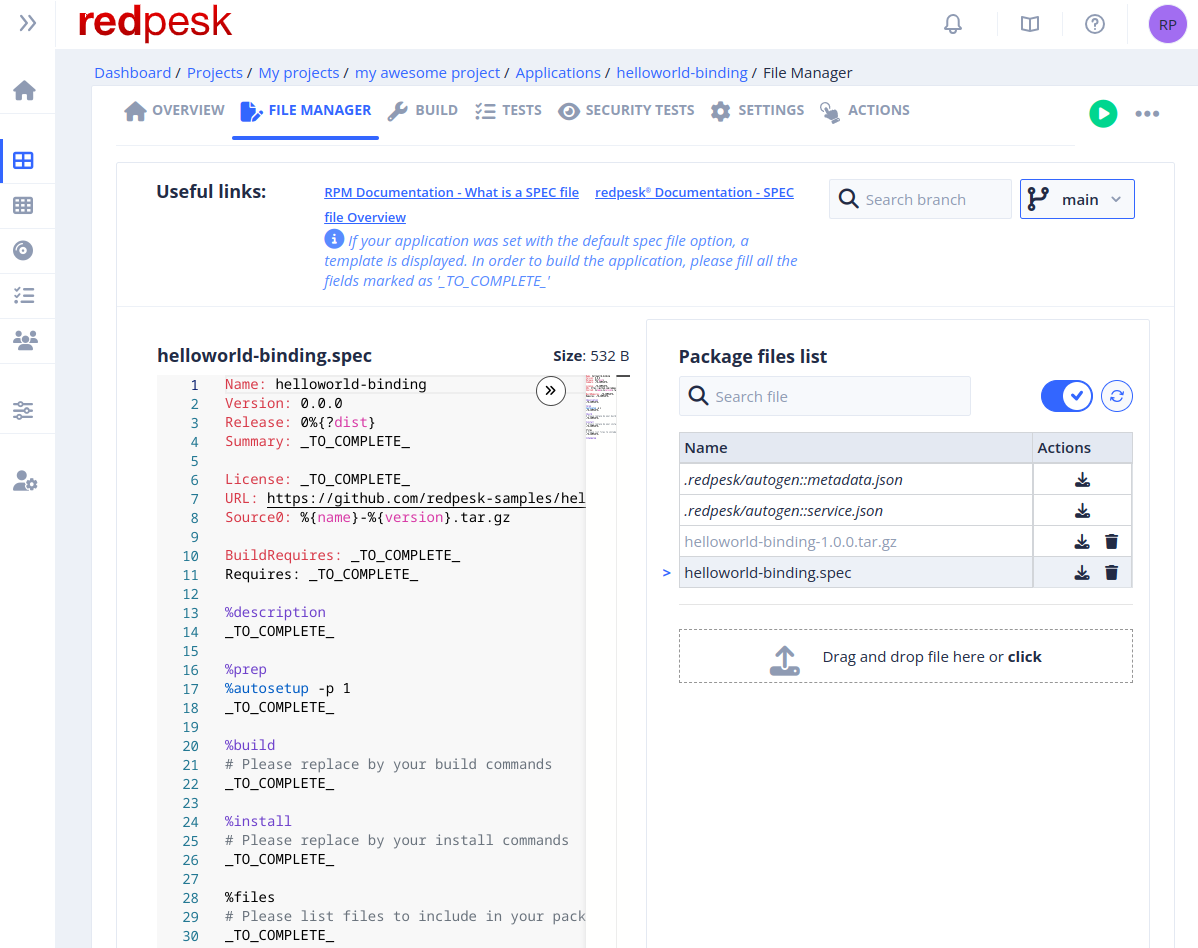
A spec file is composed of several sections :
-
Name: RPM package name -
Summary: A short description of the package -
Version: The package version -
Release: This number has to be incremented every time the package is recreated -
License: The package license, it is necessary to fill in the gaps -
URL: Project URL -
Source0 … SourceN: Tarball defining the project sources location -
BuildRequires: Required dependencies for building -
Requires: Required dependencies for the package at run time
The Documentation section
-
%description: longer description of the package -
%changelog: describes changes to apply when release is incremented
Metadata section
-
%files: contains files of rpm
Build section
-
%prep: describes how to extract tarball defined in SOURCE0…SOURCEN -
%build: this is where packages are compiled. In many cases, there is a macro %configure before a make in this section -
%install: creates the final tarball as it will be in the RPM. Created files have to be in the %{buildroot}
Install section
The %install section is where we instruct rpmbuild how to install our previously built software into the BUILDROOT.
Macros and variables
There are many macros in RPM, they contain default paths needed to build a package. They can be used to avoid hard-coding. You can find more information on the fedora website : Fedora Site about RPMMacros.
For example, %{buildroot} is a macro (whereas $RPM_BUILD_ROOT is a variable).
Build environment in the mock (in builddir/build directory) after rpmbuild:
-
BUILD: build directory where rpmbuild configures and compiles the package. -
BUILDROOT: directory where the package will be installed. This will be the directory that will be packaged. -
SOURCES: Directory containing all source patches and source tarball. -
SPECS: Directory holding the spec file(s). -
RPMS: Directory that will be used to store the built RPM packages. -
SRPMS: Directory that will be used to store the built SRPM packages. -
originals: Directory where mock puts the input files. These will split under the SPECS and SOURCES directories.
Several specific redpesk macros have been created in order to make the packaging of bindings easier. These macros are listed here below and can be seen inside the Spec File Example right after.
-
%afm_package: macro used to declare the main package -
%afm_package_test: macro used to declare the tests package -
%afm_package_redtest: macro used to declare the generic redtests package -
%afm_configure_cmake: macro used to correctly configure cmake before build -
%afm_build_cmake: macro used to run the cmake build of the project -
%afm_makeinstall: macro used to manage the installation of all the main package and its sub-packages
Spec File Examples
Basic example
To start with examples, here below is a really basic spec file, using no customized macros but only standard rpm macros. This spec file allows one to build a package named eject thanks to a “Makefile”. The full description of each part of this spec file can be found here.
Name: eject
Version: 2.1.5
Release: 1%{?dist}
Summary: A program that ejects removable media using software control

License: GPLv2+
URL: http://www.pobox.com/~tranter
Source0: http://www.ibiblio.org/pub/Linux/utils/disk-management/%{name}-%{version}.tar.gz

BuildRequires: gettext
BuildRequires: libtool

%description
The eject program allows the user to eject removable media (typically
CD-ROMs, floppy disks or Iomega Jaz or Zip disks) using software
control. Eject can also control some multi-disk CD changers and even
some devices' auto-eject features.

Install eject if you'd like to eject removable media using software
control.

%prep
%setup -q -n

%build
%configure
make %{?_smp_mflags}

%check
make check

%install
rm -rf $RPM_BUILD_ROOT
make install DESTDIR=$RPM_BUILD_ROOT

install -m 755 -d $RPM_BUILD_ROOT/%{_sbindir}
ln -s ../bin/eject $RPM_BUILD_ROOT/%{_sbindir}

%find_lang %{name}

%files -f %{name}.lang
%doc README TODO COPYING ChangeLog
%{_bindir}/*
%{_sbindir}/*
%{_mandir}/man1/*

%changelog
* Wed Oct 20 2011 John Doe <jdoe@example.com> 0.8.18.1-0.1
- Initial RPM release
Advanced example
In order to go a bit further with the examples, here below is the spec file of the helloworld-binding.
This package has dependencies on other packages to run (“Requires” sections) and uses customized macros made available in the redpesk build infrastructure: %afm_package, %afm_package_test, %afm_configure_cmake, %afm_build_cmake, etc.
###########################################################################
# Copyright (C) 2015-2026 IoT.bzh Company
#
# Licensed under the Apache License, Version 2.0 (the "License");
# you may not use this file except in compliance with the License.
# You may obtain a copy of the License at
#
#     http://www.apache.org/licenses/LICENSE-2.0
#
# Unless required by applicable law or agreed to in writing, software
# distributed under the License is distributed on an "AS IS" BASIS,
# WITHOUT WARRANTIES OR CONDITIONS OF ANY KIND, either express or implied.
# See the License for the specific language governing permissions and
# limitations under the License.
###########################################################################
Name:    helloworld-binding
Version: 8.99.6
Release: 3%{?dist}
License: APL2.0
Summary: helloworld service set to be used in redpesk
URL:     https://github.com/redpesk-samples/helloworld-binding
Source0: %{name}-%{version}.tar.gz

BuildRequires: afm-rpm-macros
BuildRequires: cmake
BuildRequires: gcc gcc-c++
BuildRequires: afb-cmake-modules
BuildRequires: pkgconfig(json-c)
BuildRequires: pkgconfig(libsystemd) >= 222
BuildRequires: pkgconfig(libafb)
BuildRequires: pkgconfig(libmicrohttpd) >= 0.9.55
BuildRequires: pkgconfig(afb-libhelpers)

%description
The helloworld service gathers two bindings.
- helloworld-skeleton: Increment a counter
- helloworld-subscribe-event: Subscribe and get notified whether an event is emitted

# main package: default install in /var/local/lib/afm/applications/%%{name}
%afm_package
# test package: default install in /var/local/lib/afm/applications/%%{name}-test
%afm_package_test
%afm_package_redtest

%prep
%autosetup -p 1

%build
%afm_configure_cmake
%afm_build_cmake

%install
%afm_makeinstall

%check

%clean

%changelog

* Wed Jun 24 2020 IoT.bzh <armand.beneteau.iot.bzh> 8.99.6
- Add the use of cmake template for run-redtest

* Mon May 18 2020 IoT.bzh(iotpkg) <redpesk.list@iot.bzh> gcde438ae
- Upgrade version from source commit sha: cde438aed1e990b69d4ed2fb3aa3b4ba22e78a6a
- Commit message:
- 	Correction inside the run-redtest script (#3)
-

* Mon May 18 2020 IoT.bzh <clement.benier@iot.bzh> 8.99.6
- bump version of afm-rpm-macros

* Wed Apr 29 2020 IoT.bzh <redpesk.list.iot.bzh> 8.99.6
- Modifications in order to add a redtest subpackage

* Wed Feb 19 2020 IoT.bzh <redpesk.list.iot.bzh> 8.99.5
- Modifications in order to add a test subpackage

* Fri Feb 14 2020 IoT.bzh <redpesk.list.iot.bzh> 8.99.5
- Creation of the spec file from redpesk generator
Patch
This chapter is also the opportunity to present you a nice feature coming along with redpesk.
We, as developers, know that sometimes mistakes can occur. Unfortunately we won’t help you fix your code, but at least we can let you patch your source and build your package in the blink of an eye.
Let’s consider you have noticed a missing semicolon in the helloworld source files and you want to do a fix without doing a commit in the source repository. Then, patch your source directly in the redpesk project is what you might consider doing.
First of all, create the patch which fix the error you noticed. For instance, here is the one that fix a missing semicolon, provided by:
devel@redpesk: ~/helloworld-binding git format-patch HEAD~1
0001-Quick-fix-for-build-in-redpesk.patch
Patch content:
From 4ac7f6bc8fc75cdf019cb1baee609d03c1fbd72c Mon Sep 17 00:00:00 2001
From: Marc-Antoine Riou <marc-antoine.riou@iot.bzh>
Date: Mon, 11 Jan 2021 13:58:40 +0000
Subject: [PATCH] Quick fix for build in redpesk

Signed-off-by: Marc-Antoine Riou <marc-antoine.riou@iot.bzh>
---
 helloworld-skeleton/helloworld-service-binding.c | 2 +-
 1 file changed, 1 insertion(+), 1 deletion(-)

diff --git a/helloworld-skeleton/helloworld-service-binding.c b/helloworld-skeleton/helloworld-service-binding.c
index a0b3c05..d0c01a1 100644
--- a/helloworld-skeleton/helloworld-service-binding.c
+++ b/helloworld-skeleton/helloworld-service-binding.c
@@ -26,7 +26,7 @@ static void pingSample(afb_req_t request)
 {
        static int pingcount = 0;

-       afb_req_success_f(request, json_object_new_int(pingcount), "Ping count = %d", pingcount)
+       afb_req_success_f(request, json_object_new_int(pingcount), "Ping count = %d", pingcount);

        AFB_API_NOTICE(afbBindingV3root, "Verbosity macro at level notice invoked at ping invocation count = %d", pingcount);

--
2.29.2
⚠️⚠️ Do not include this patch in your project. It is just an example to present you the patch feature ⚠️⚠️
For the patch to be effective during the build, follow the instruction down below:
- Add the patch in your project’s application
- Edit the application’s specfile for the patch to be considered
There are two different ways of applying a patch in your project’s application:
UI
rp-cli
# Send the patch
rp-cli applications upload helloworld-binding --file-path ./0001-Quick-fix-for-build-in-redpesk.patch
# Modification of specfile to add the "Patch: 0001-Quick-fix-for-build-in-redpesk.patch" (cf. video above)
vim ./helloworld-binding.spec
# Send the new spec file
rp-cli applications upload helloworld-binding --file-path ./helloworld-binding.spec
Build the application
The application build is manually triggered via the web UI inside application overview. Triggering many applications inside a project is not available, but it will be enabled in the next update.
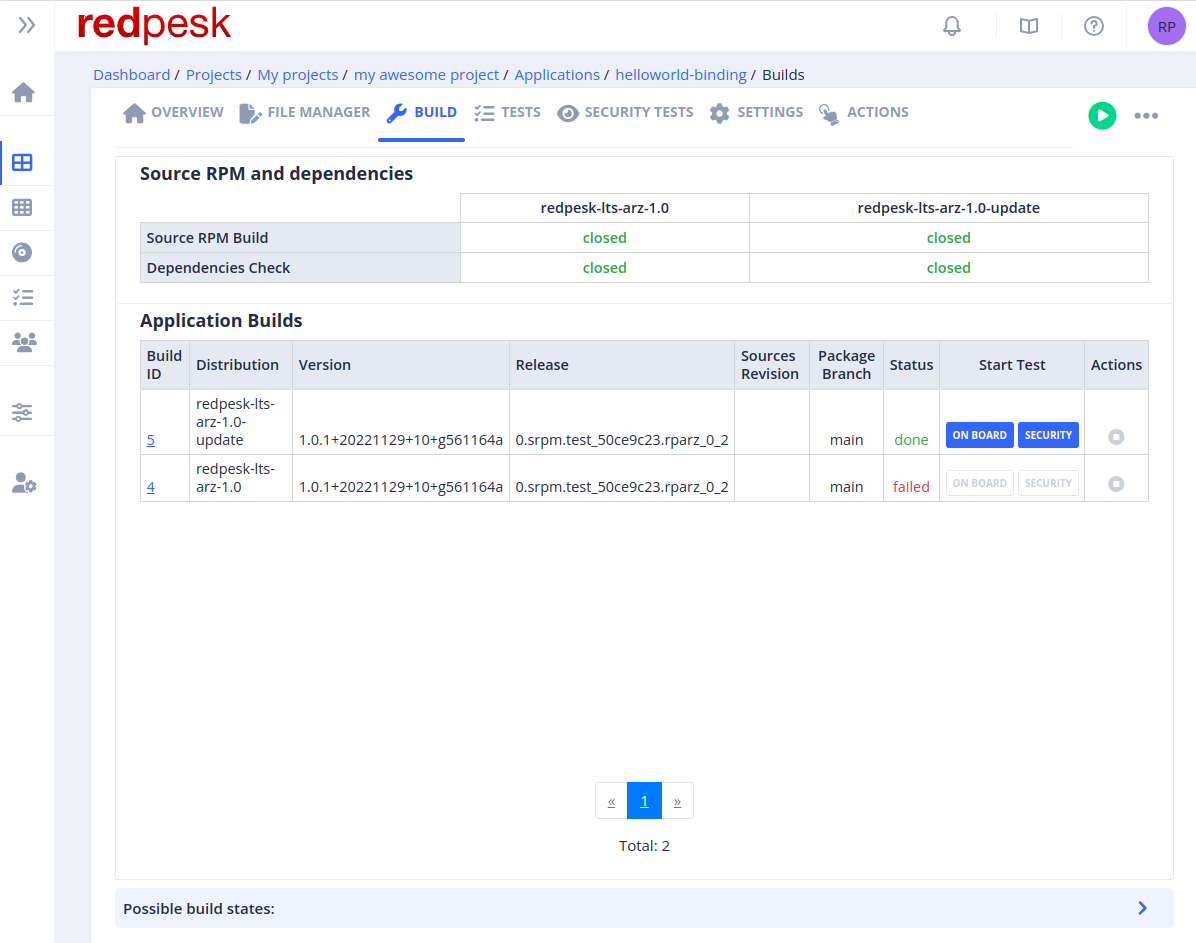
If the package fails to build
- Checking the logs can give you an indication of the reason leading to this failure.
If the build result is successful
- If everything went well, it is time to go to the next step, installing the generated package on the board (Only if the new repo is already created)
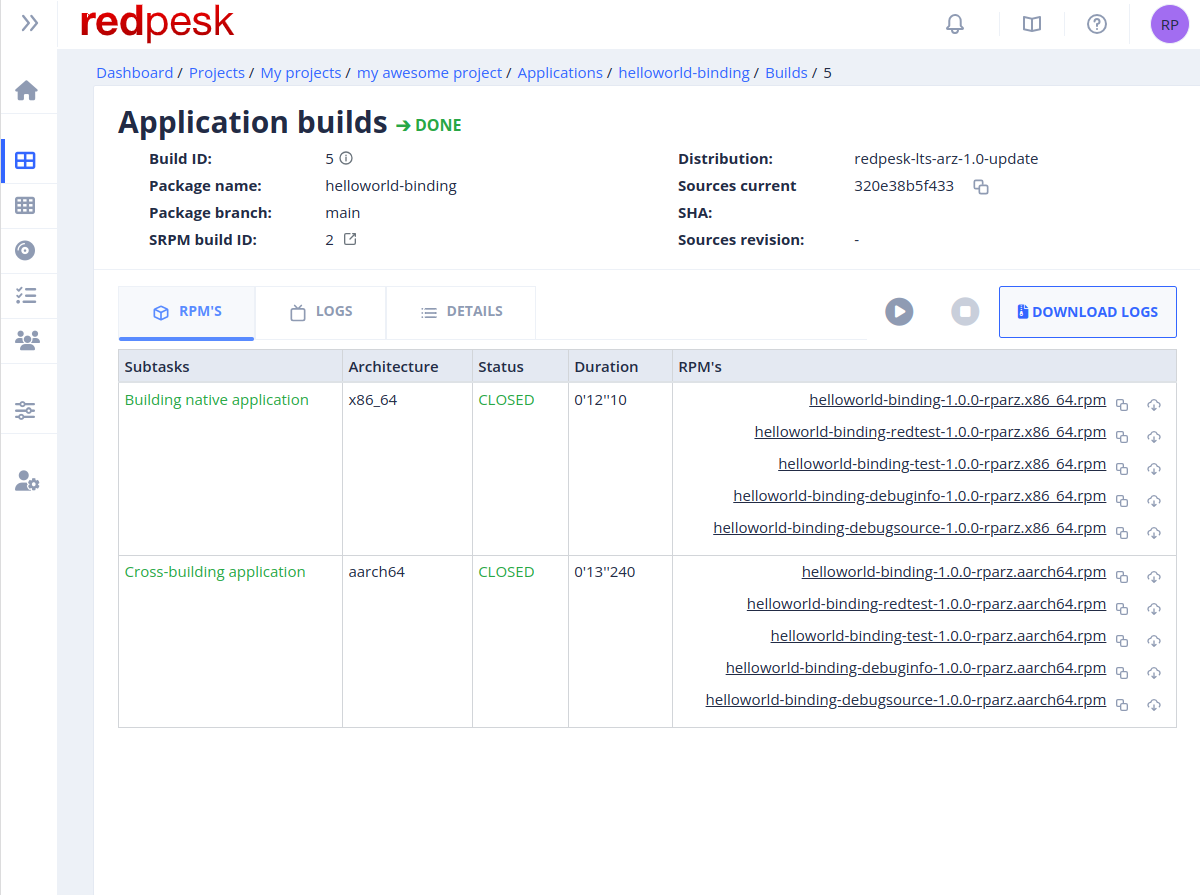
Logs
After the end of a build, if the latter fails, the logs can be viewed inside each build information.
When a build is running, many tasks run simultaneously. You can check more information about tasks, here: Task Concept
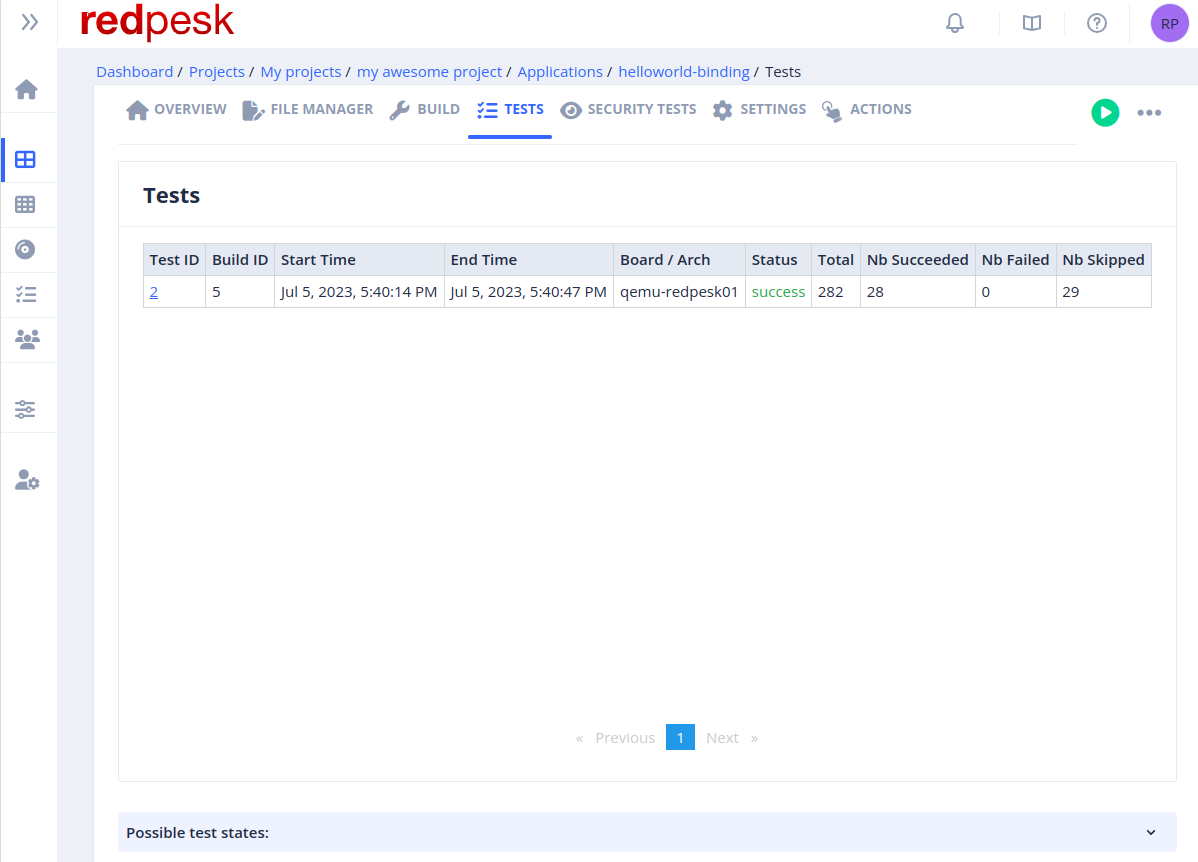
Testing
Two kinds of tests exist in the redpesk® CI process.
The first type corresponds to the %check section inside the spec file. The tests under this section are run at build time by the redpesk® infrastructure. If this section is included, the success of these tests is mandatory to have a successful build.
The second type can be described as integration tests. These tests are run after a successful build and are based on two packages resulting from the build: the main package corresponding to the application and the “test” package. A global view of this process can be seen on the diagram here below:

The diagram illustrates the fact that to create the packages, the application source files and a spec file are needed. In order to learn more about the spec file details, please refer to: How to write spec
Here below, a screenshot of the tests interface inside the redpesk webUI.
redpesk integration tests: redtests
Redtests are enhanced ptests. Ptests come from the Yocto environment, they are described in the Yocto wiki.
The main difference between redtests and ptests is the output format of the tests. While a ptest wants a “simple test” format (result: testname), a redtest requires the tests output to comply with the Test Anything Protocol. The main benefit is the ability to see test progress during the tests run.
Here below, an exhaustive list of what is needed by the redpesk infrastructure to run redtests.
-
In addition to the application main package, the spec file needs to generate a second package, whose name ends with -redtest. For instance, in the case of a package named helloworld-service, the redtest package is named helloworld-service-redtest. This package contains the file structure necessary to run the tests.
-
In the installation section of the spec file, the content of the “-redtest” package needs to be installed under the /usr/libexec/redtest/<package> directory. In the case of the helloworld-service-redtest package, the directory path is /usr/libexec/redtest/helloworld-service.
-
Inside the test package (and therefore under /usr/libexec/redtest/<package>), a script or a binary named run-redtest must be present. This script is executed by the redpesk® infrastructure on the target to run the tests. In the helloworld-service-redtest package, the redpesk® infrastructure calls the script/binary file named /usr/libexec/redtest/helloworld-service/run-redtest. It is important to notice that this file needs to be executable!
-
The run-redtest file can test anything you like, there are only two restrictions: standard output (stdout) contents need to be in T.A.P. format and the output needs to be saved as a “.tap” file under /var/log/redtest/<package> directory. In the helloworld-service-redtest package, the log file is saved under /var/log/redtest/helloworld-service. The name of the “.tap” file does not need to abide by any specific format.
Once the two packages built, the integration tests can be triggered automatically or manually (depending on the setting). During this process, the redpesk® infrastructure installs the two packages on a target, and runs the tests. While they are running, a live console is available on the webUI: it contains the standard output (stdout) and the standard error (stderr). Moreover, at the end of the tests, the results are available along with a zip file containing the two outputs (stout and stderr) and the tests logs file.
A “Quickstart guide” is available in order to setup your application to be “Redtests ready”.
Encapsulating other test types in redtests
Because redtests are completely generic, it is quite easy to encapsulate other types of tests in it. For this paragraph, we will take the case of microservice bindings tests.
For more information about the application framework, bindings and binder, please refer to the “Developer Guides”.
The test framework for the microservice bindings uses LUA language to describe tests. To learn more about this framework, go to the “Binding Tests” chapter of this documentation. It includes everything needed to write tests for your binding.
The “Spec File example” section gives an example of spec file generating three packages: helloworld-binding, helloworld-binding-test and helloworld-binding-redtest. Some redpesk® macros allow one to easily build a package and its “test” and “redtest” subpackages from the spec file.
Once the packages are built, the helloworld-binding-test sub-package contains the actual tests to run, when the helloworld-binding-redtest contains only the run-redtest executable that makes the right calls to the test framework. In this case, the helloworld-binding-redtest has a dependency on the helloworld-binding-test since it uses it to run the tests.
In the redpesk infrastructure, the spec file macro named %afm_package_redtest takes care of this dependency.
A full test encapsulation can be found in the example project named helloworld-binding.
At the root of this project, two directories are dedicated to test: ./test and ./redtest. They correspond respectively to the helloworld-binding-test and helloworld-binding-redtest sub-packages.
Inside the ./redtest directory can be found two files:
-
run-redtest.in : it is a cmake template used to generate the run-redtest script that the redpesk infrastructure runs on target during the test process. For this package, the template looks like that:
#!/bin/bash

BINDING_NAME="@BINDING_NAME@"
BINDING_TEST_NAME="@BINDING_TEST_NAME@"
AFB_TEST_BINDER="afbtest"

# Get the name of the test binder
TEST_BINDER=$(afm-util list -a | jq -r .[].id | grep ${AFB_TEST_BINDER})

# Get the name of the package inside afb environment
APP=$(afm-util list -a | jq -r .[].id | grep "${BINDING_NAME}$")

# Start the corresponding app if it does not already run
RUNNING_APP=$(afm-util ps | jq -r .[].id | grep $APP)
if [ -z "$RUNNING_APP" ]
then
    afm-util start $APP
fi

# Get the binding test name
TEST_BINDING=$(afm-util list -a | jq -r .[].id | grep ${BINDING_TEST_NAME})
# Launch the test included in the package
afm-util start ${TEST_BINDING}

# Create the directory where the logs need to be
mkdir -p /var/log/redtest/${BINDING_NAME}/

# Copy the logs from source to new location
cp -a /home/`id -u`/app-data/${BINDING_TEST_NAME}/* /var/log/redtest/${BINDING_NAME}/

# Assigns the correct rights
chmod 770 -R /var/log/redtest/${BINDING_NAME}/
chown root:users -R /var/log/redtest/${BINDING_NAME}/

# Stop the app that we were testing
afm-util terminate $APP
- CMakeLists.txt: it contains the different instructions to create the run-redtest script from the template and to install it. For this package, the template looks like that:
###########################################################################
# Copyright (C) 2015-2026 IoT.bzh Company
#
# Licensed under the Apache License, Version 2.0 (the "License");
# you may not use this file except in compliance with the License.
# You may obtain a copy of the License at
#
#     http://www.apache.org/licenses/LICENSE-2.0
#
# Unless required by applicable law or agreed to in writing, software
# distributed under the License is distributed on an "AS IS" BASIS,
# WITHOUT WARRANTIES OR CONDITIONS OF ANY KIND, either express or implied.
# See the License for the specific language governing permissions and
# limitations under the License.
###########################################################################

set(BINDING_NAME "helloworld-binding")
set(BINDING_TEST_NAME "helloworld-binding-test")

configure_file(run-redtest.in run-redtest @ONLY)

install(PROGRAMS ${CMAKE_BINARY_DIR}/redtest/run-redtest
    DESTINATION /usr/libexec/redtest/${BINDING_NAME}/)
So, a user wanting to build a “redtest” package for its own binding, needs to write its tests under a “/test” directory and then copy
Current limitation
- For the moment, the only available target for testing is a x86_64 virtual target (i.e. simulated targets based on QEMU).