Mender integration
Mender is an open source solution to manage a fleet of targets, including deploying software updates to them, in a reliable manner. This page details the instructions needed to perform an application deployment and update via Mender using the redpesk local builder and the hosted Mender infrastructure, which comprises the Mender-maintained servers.
In addition to requiring your redpesk local builder setup, you will need to open an account on https://eu.hosted.mender.io so that you can connect your target there.
Hosted Mender account
The very first step is to proceed over to https://eu.hosted.mender.io and follow the instructions there to open an account.
NOTE: If you connect to mender with a github or google account, you will not be able to connect to it from the mender-cli within your localbuilder. So create or use a real mender account.
Target setup
The next part of the setup takes place on the target itself, as we will
configure the Mender client included in the image to connect to the Hosted
Mender servers at eu.hosted.mender.io. The following commands, unless noted,
will thus be run in your target SSH connection.
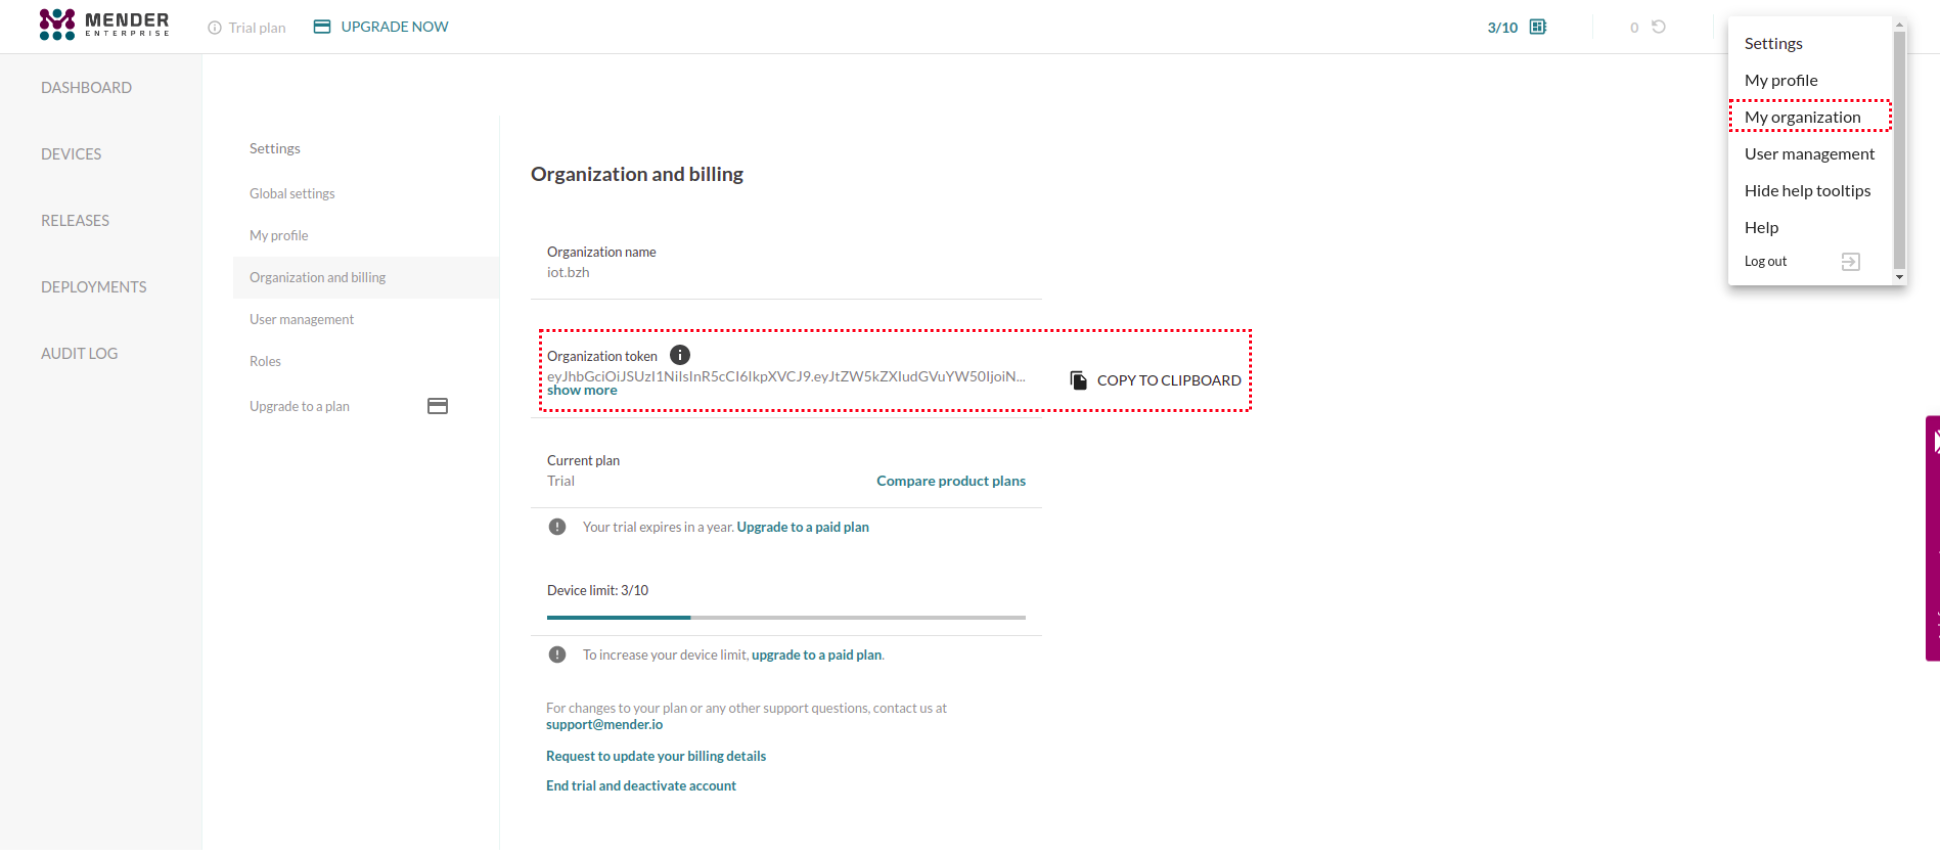
Your account on eu.hosted.mender.io gave you access to a tenant token. Under the
eu.hosted.mender.io UI, under the top-right menu, ‘My organization’ submenu.
Update the one below with yours (no spaces or newlines should be inserted).
export TENANT_TOKEN="HOSTED_MENDER_IO_TENANT_TOKEN"
Next, configure the Mender client to connect to the eu.hosted.mender.io server:
#specify the device type
DEVICE_TYPE="<YOUR_DEVICE_TYPE>"
#configure and start Mender client
mender setup \
  --device-type $DEVICE_TYPE \
  --hosted-mender \
  --tenant-token $TENANT_TOKEN \
  --retry-poll 30 \
  --update-poll 5 \
  --inventory-poll 5 && \
systemctl enable --now mender-client
The board will then connect to the hosted Mender servers. Go into your
eu.hosted.mender.io account UI and under the ‘Devices’ tab, pick up the new entry
corresponding to your board and authorize the device. The inventory information
(i.e extended target information) will typically load after 5 minutes.
Base localbuilder setup
Now go into your redpesk local builder SSH shell and perform the following steps.
First, check you are able to login to the Mender server on the commandline.
This is done via the mender-cli binary by specifying your eu.hosted.mender.io
account username. You’ll be prompted for a password.
export MENDER_IO_USERNAME="<YOUR_HOSTED_MENDER_IO_USERNAME>"
mender-cli login --server https://eu.hosted.mender.io --username $MENDER_IO_USERNAME
You should get a login successful answer.
Artifact generation
All of the Mender artifact generation is performed in the redpesk local builder console shell.
The make-mender-artifact and upload-mender-artifact binaries can be used to generate Mender
artifacts. These are special tar archives which Mender uses for deployments to
the managed targets.
We will use mustach, a sample application, to demo a typical Mender
application deployment. (For more details please follow the standard instructions in the Local
Builder (Go to : Getting started -> Local builder-> Build -> Build the RPM packages) section to build the application once).
Once built, the mustach RPM will be available under
/home/devel/rpmbuild/RPMS/aarch64/mustach-X.Y.Z-0.rpdarz.aarch64.rpm (with X.Y.Z the version of the package). It is the one we
will package into a Mender artifact.
Note: In the following the package version will be refered to as X.Y.Z.
Create the directory used to hold all artifacts so that we do not pollute the RPM build output:
export MENDER_DIR=/home/devel/rpmbuild/MENDER
mkdir -p $MENDER_DIR
Generate a mender artifact for the RPM. By default, the artifact will be created
in the same directory as the RPM. We override this behavior via the
--output|-o option to point to our artifact directory:
# Generate an artifact using mustach-X.Y.Z-0.rpdarz.aarch64.rpm rpm
# X.Y.Z : mustach version (in this example the version is 1.1.0)
# For more information about the use of make-mender-artifact :
# $make-mender-artifact -h
make-mender-artifact -d $DEVICE_TYPE -p rpm-os -n mustach-1.1.0-0 -o ~/rpmbuild/MENDER ~/rpmbuild/RPMS/aarch64/mustach-1.1.0-0.rpdarz.aarch64.rpm
Note : The name of the rpm file used to generate the artifact must adhere to specific guidelines. It should consist solely of letters, digits, and certain characters from the set “.,_-“ to create the artifact successfully.
Note : The payload redpesk-payload can either be :
- ‘rpm-os’ for rpm packages
- ‘rpm-redpak’ for redpak package updates
- ‘rpm-dir’ for updating all installed packages on target
Next, upload the artifact to the Mender server. As you previously logged in, you should not be asked for your password again.
#Upload the artifact to the server
upload-mender-artifact -u $MENDER_IO_USERNAME ~/rpmbuild/MENDER/mustach-1.1.0-0.mender
The final step is to go to the eu.hosted.mender.io web UI. The newly uploaded
package will be available under the Releases tab:
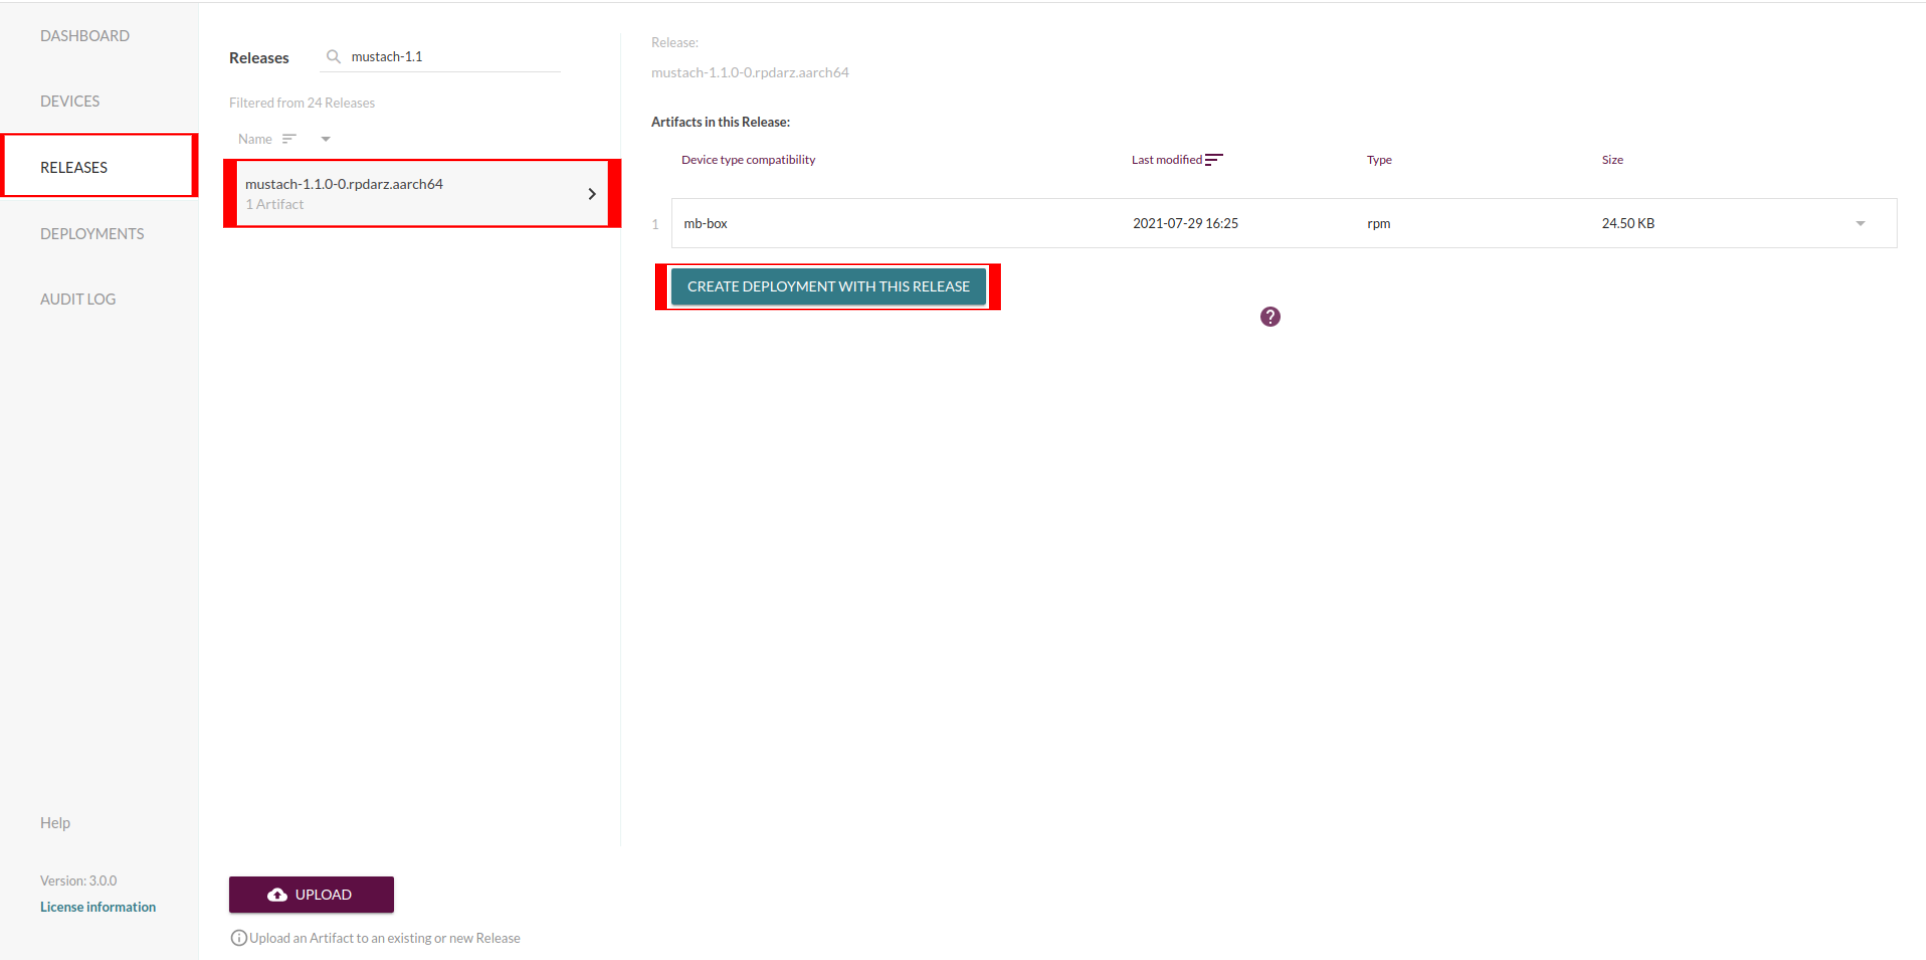
One can then create a new Deployment targeting their device using it.
For more information on how to manage releases and create deployments for them, please see the hosted Mender documentation
Application updates
The next step is to modify the mustach app, for instance to modify the version information as per this diff:
diff --git a/mustach-tool.c b/mustach-tool.c
index befde90..1885b87 100644
--- a/mustach-tool.c
+++ b/mustach-tool.c
@@ -128,7 +128,7 @@ int main(int ac, char **av)
                if (!strcmp(*av, "-h") || !strcmp(*av, "--help"))
                        help(prog);
                if (!strcmp(*av, "-v") || !strcmp(*av, "--version")) {
-                       printf ("Mustach v1.1.0\n");
+                       printf ("Mustach v1.1.1\n");
                        exit(0);
                }
                f = (av[0][0] == '-' && !av[0][1]) ? "/dev/stdin" : av[0];
Next, rebuild the application as per the Local Builder instructions.
Do not forget to update the Version: field in mustach.spec as well.
Make a new artifact using make-mender-artifact and upload it to the server:
# Generate and upload the artifact using mustach-X.Y.D-0.rpdarz.aarch64.rpm rpm
# X.Y.D : mustach version after update (after update version is incremented to 1.1.1)
make-mender-artifact -d $DEVICE_TYPE -p rpm-os -n mustach-1.1.1-0 -o ~/rpmbuild/MENDER ~/rpmbuild/RPMS/aarch64/mustach-1.1.1-0.rpm
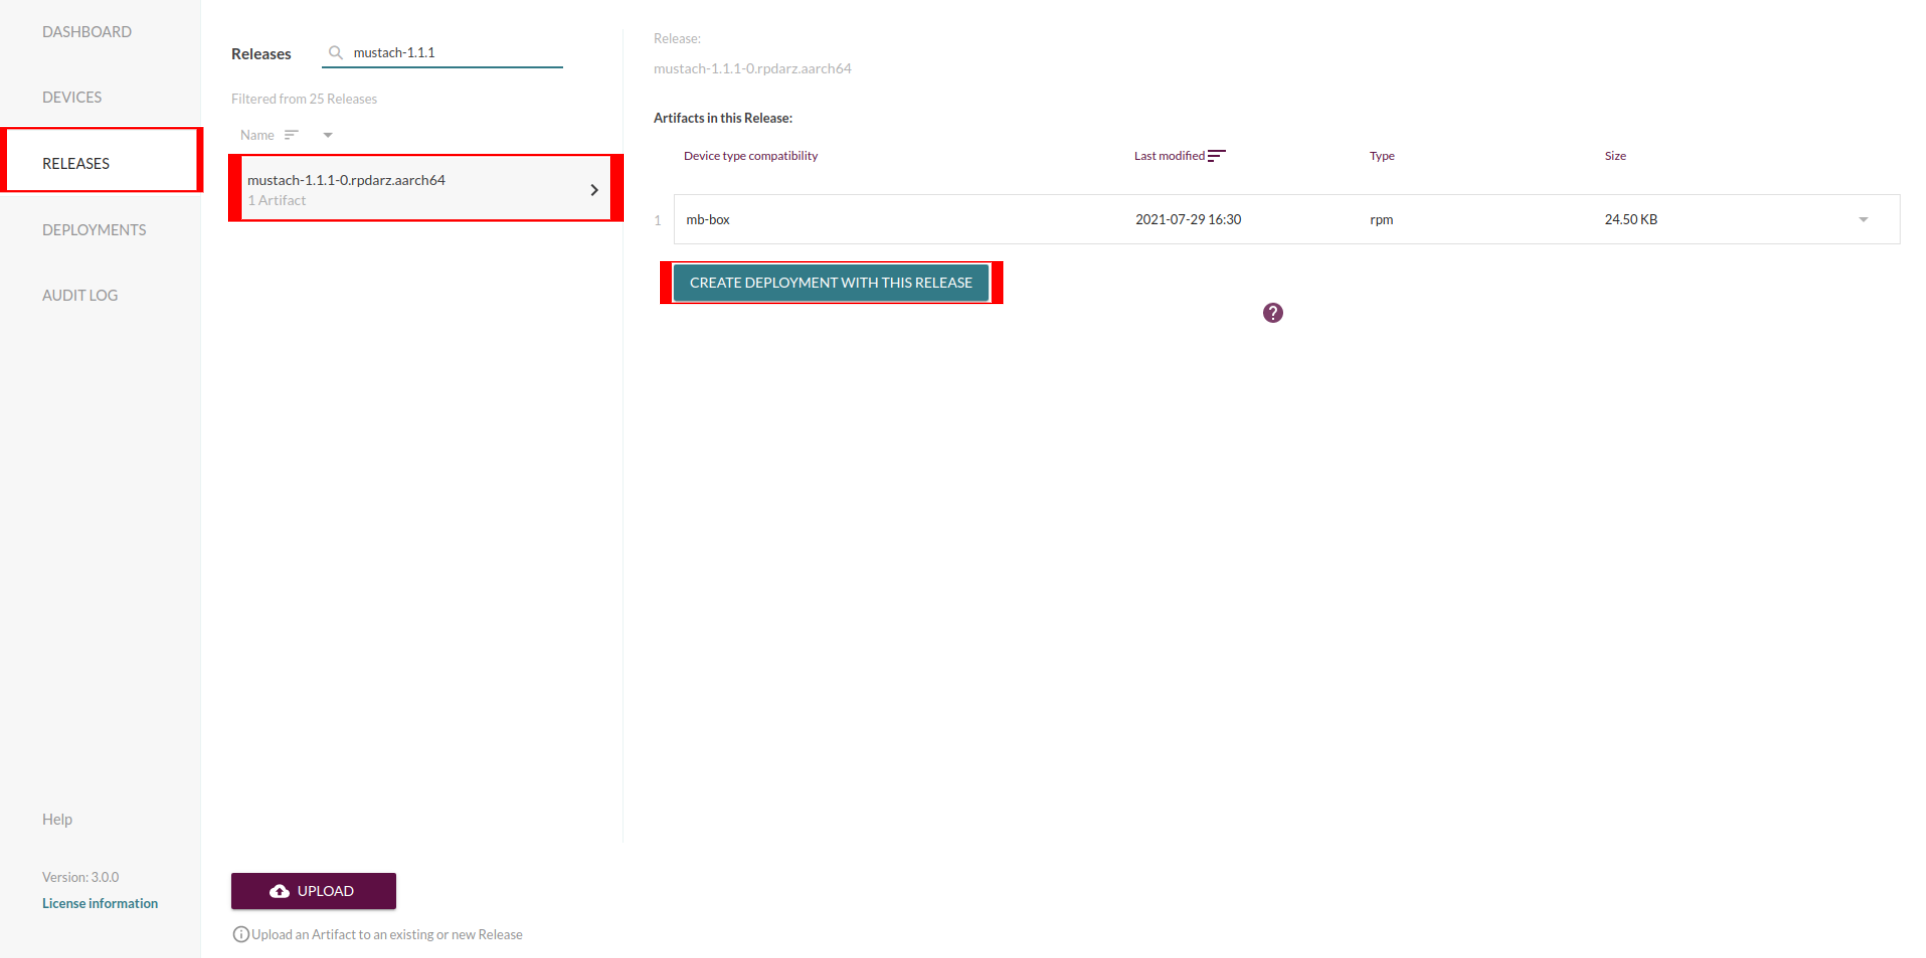
upload-mender-artifact -u $MENDER_IO_USERNAME ~/rpmbuild/MENDER/mustach-1.1.1-0.mender
The newly uploaded artifact will be present in the UI to create a new deployment on the target.
Once deployment is done, one can verify the new package has been uploaded by querying the RPM database on the target itself:
$ rpm -q mustach
mustach-1.1.1-0.rpd28.aarch64
Mender-connect Deployment
Mender-connect enhances the Mender client, allowing one to log in to the devices remotely and start a shell in a remote terminal session.
In this section we will install, enable and start the service:
# On the device
dnf install mender-connect
systemctl enable mender-connect && systemctl start mender-connect
Now, you will be able to see the “troubleshoot” add-on in the Mender.io UI. Please be aware this will only work if you have the add-on enabled.
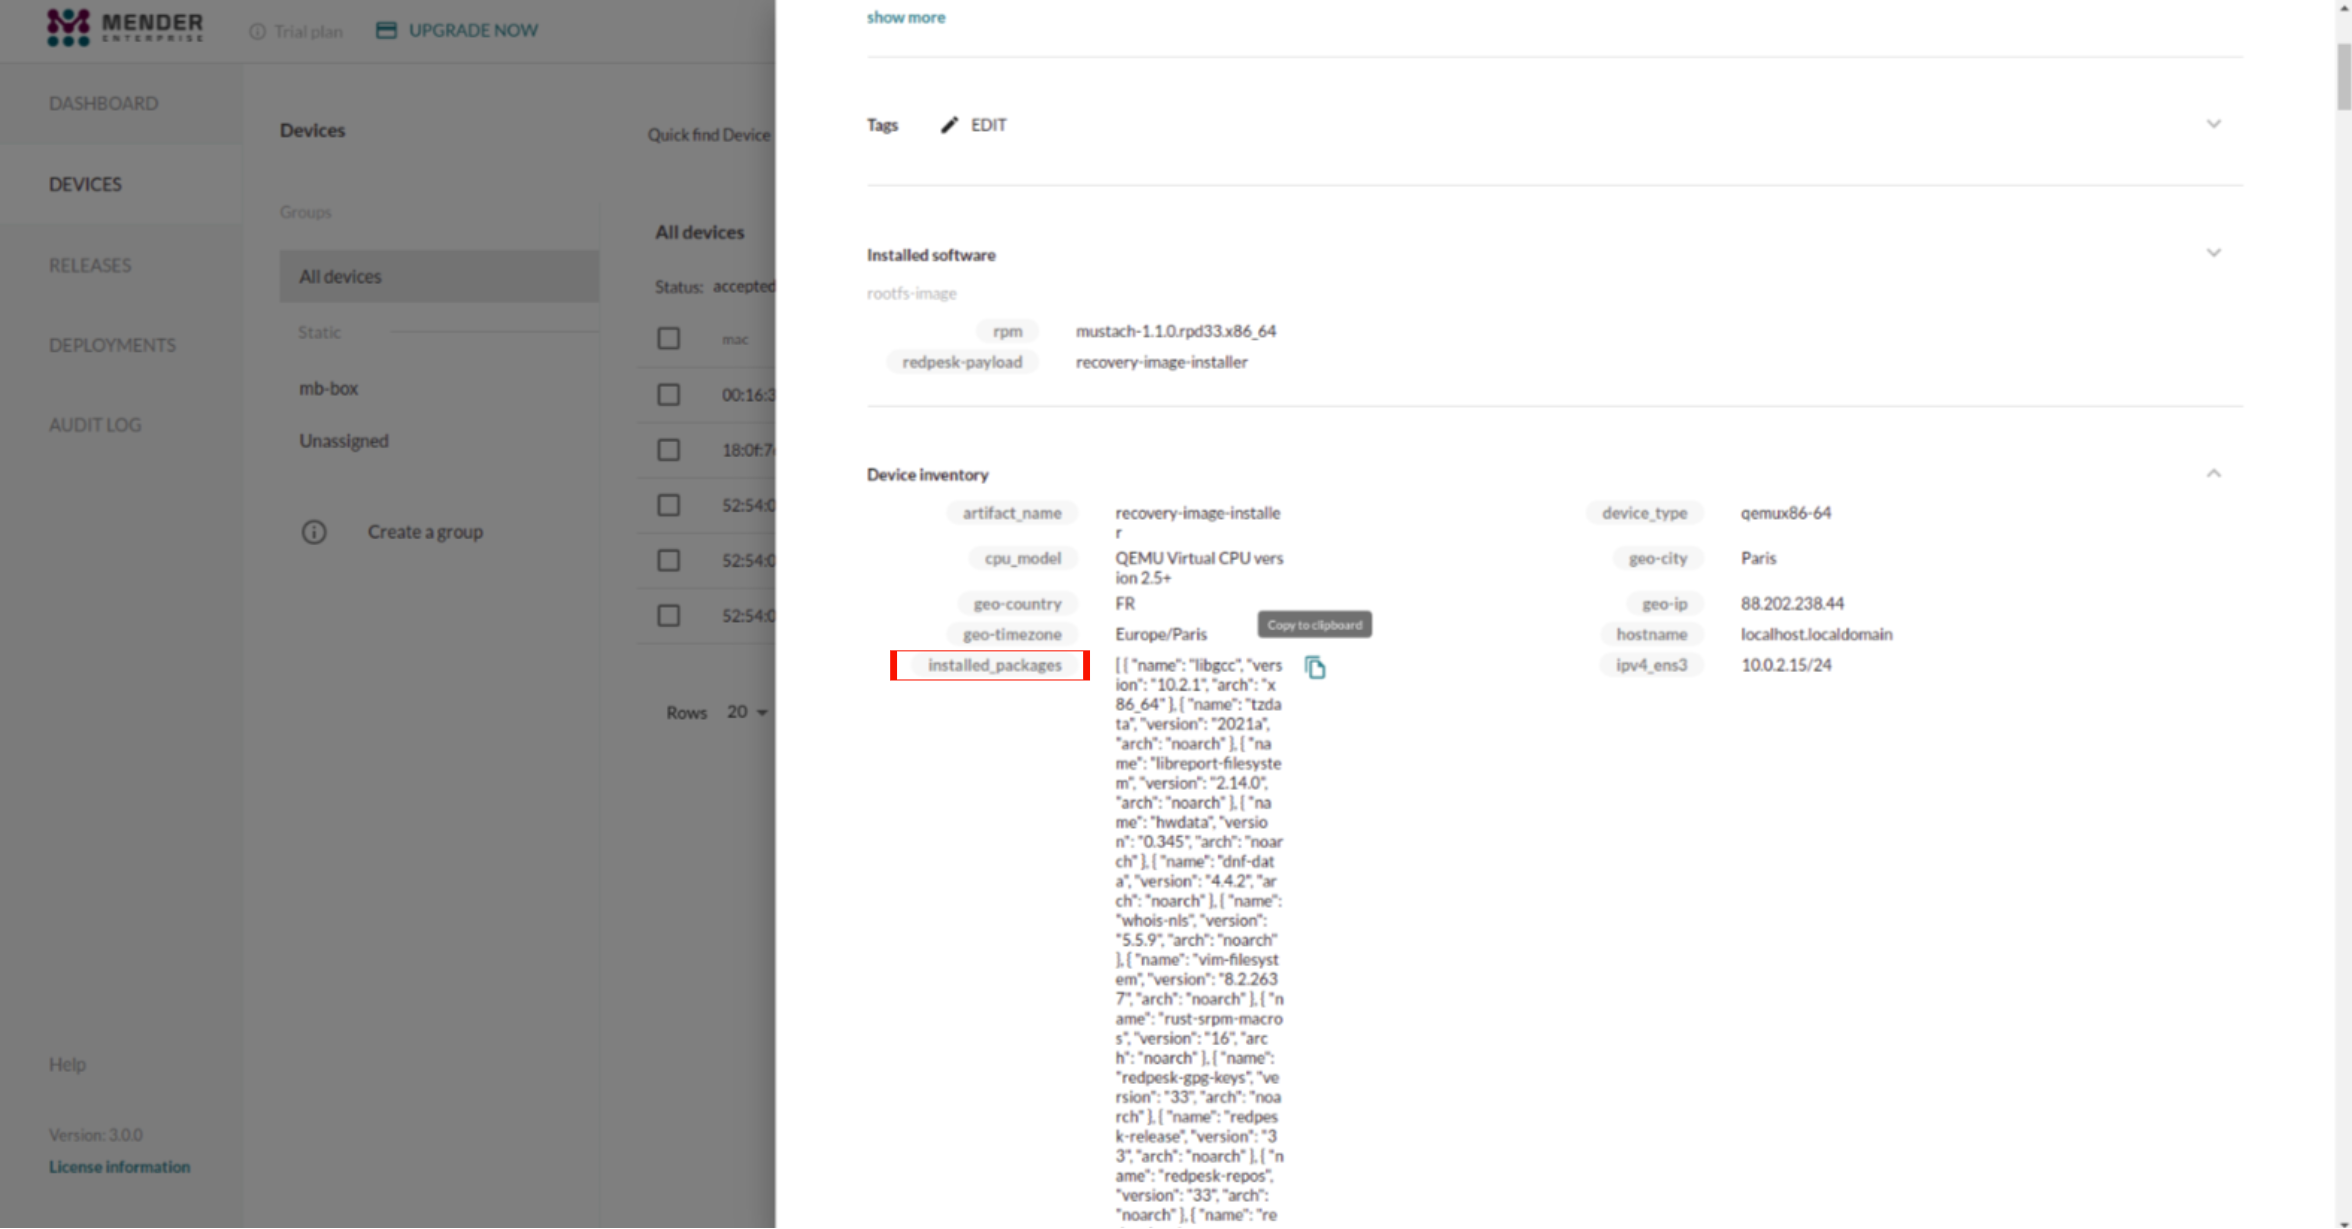
Update all packages on the target
First, we need to get the list of all packages installed on the target and which repository to check the updates from. To do so, all we need to do is to go on the web UI and select ‘view details’ of the device to update packages on, then copy the json containing all the data concerning installed packages and their version on target from the device inventory.
From this list, we can check if there is any available update. If there is, it creates either a delta rpm based on the
version installed on the target if available, otherwise it downloads the latest rpms and saves them in a temporary directory
that will be passed to the make-mender-artifact binary to generate the artifact.
# For detailed information about the usage of make-packages-update-set:
# make-packages-update-set -h
installed_packages_json_path='<PATH_TO_TARGET_INSTALLED_PACKAGES_JSON_FILE>'
arch="<TARGET_ARCH>"
baseurl='<REPO_BASEURL>'
outdir='<OUTPUT_DIRECTORY>'
make-packages-update-set --repo-baseurl ${baseurl} --outputdir ${outdir} --arch ${arch} "${installed_packages_json_path}"
Now that we have our directory containing the rpms/delta rpms to update on target, we need to generate an artifact and upload it to the server.
make-mender-artifact -d $DEVICE_TYPE -p rpm-dir -n update -o ~/rpmbuild/MENDER ${outdir}
upload-mender-artifact -u $MENDER_IO_USERNAME ~/rpmbuild/MENDER/update.mender
Finally, to deploy the artifact we need to go to the webUI and follow the same instructions listed in the section above.