Project environments
Introduction
Environments are available inside projects. Environments allow to have various variants of your projects to define for example different secrets.
A common usage is to define in your project one environment for production (eg.
named prod), one environment for development (eg. named dev), etc…
Then you can define for example secret values that differ between production and
development. You can also manage who can access to prod environment
and who can access to dev environment.
WARNING : With factory version Armel 1.10, for technical reason only initial (default) environment is available.
Consequently it is expected that “+ ENVIRONMENT” button is disabled in factory WebUI.
Creation
When you create a project, an initial environment is automatically associated
to this project and is named: default.
Feel free to change this name and adjust settings depending on your needs.
WebUI
Environment management is available in the Environments tab of the project.

Use + ENVIRONMENT button to create a new one knowing that settings are:
-
Name: mandatory field, better to keep short naming, -
Description: optional, free form string just used to help to clarify environment usage, -
Unprotected: when set, allows to export or retrieve project settings (including secrets definition) outside of the factory
WARNING: it’s a real bad idea/usage to unprotect an environment dedicated to production.
Unprotecting an environment may result in leaking internal settings or secrets definition outside of the factory.
Nevertheless, note that a project environment must be unprotected to allow to “clone” the project locally in a localbuilder (see localbuilder project packaging chapter for more details.)
redpesk-cli
To create a new environment:
$ rpcli projects environments add my-nice-project dev2 --description "Dedicated to the 2nd development team"
-- Environment creation requested by user --
Request the factory to create the new environment 'dev2'...     [OK]
It is also possible to manage project environments from redpesk command line, alias rp-cli.
To list the environments of a project, just use the slug of your project :
$ rpcli projects environments list my-nice-project
Name     Default Unprotected
prod     true    false
dev      false   true
dev2     false   true

$ rpcli projects environments list my-nice-project --verbose
Name:            prod
Description:     Environment dedicated to production
Project UUID:    0c172dc6-22fa-46d2-807b-a31e349a1f9c
Default:         true
Unprotected:     false

Name:            dev
Description:     Environment dedicated to development
Project UUID:    ee2a9b92-0518-4adc-ac98-7f59f91aa509
Default:         false
Unprotected:     true

Name:            dev2
Description:     Environment dedicated to the 2nd development team
Project UUID:    85670fed-2499-4d1b-b390-90ea742c763d
Default:         false
Unprotected:     false
Selection
WebUI
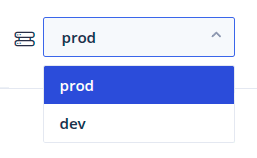
You can easily switch or check at any time which environment is currently selected by using the drop-down box located in the top-right part of the WebUI.
Here an example with 2 environments (prod is currently selected):
redpesk-cli
All commands where environment needs to be specified include and env-name argument.
Updating
WebUI
To update an environment, browse to Environments tab of project and simply
click on the pencil icon of the environment you want to update.
Update the field you want to change and then click on Save.
redpesk-cli
To update an environment, just specify the project slug, the environment name and the option you want to change:
rpcli projects environments update my-nice-project dev2 --unprotected true
-- Environment update requested by user --
The environment 'dev2 of project my-nice-project is currently protected.
Attention! When a project's environment is un-projected, some data may be exposed externally, for example in localbuilder.
Are you sure you want to unprotect the environment 'dev2' of project 'my-nice-project'? (Y/n)
> y
Request the factory to update the environment 'dev2'... [OK]
Note: you can use
--forceoption to avoid interactive confirmation.
WARNING: it’s a real idea / usage to unprotect an environment dedicated to production usage. Unprotecting an environment may result in leaking internal settings or secrets definition outside of the factory.
Deleting
WebUI
To delete an environment, browse to Environments tab of the project and simply
click on the trash icon of the environment you want to delete.
redpesk-cli
To delete an environment, just specify the project slug and the environment name as follow:
$ rpcli projects environments delete my-nice-project dev2
-- Environment deletion requested by user --
Are you sure you want to delete the environment 'dev2'? (Y/n)
> y
Request the factory to delete the environment 'dev2'... [OK]
Note: you can use
--forceoption to avoid interactive confirmation.