Deploying and running a redpesk image for the Phytec phyBOARD®-AM62x Development Kit
The phyBOARD®-AM62x Development Kit is composed of the phyCORE-AM62x SOM (TI AM6254 SoC) and a carrier board.
It provides a lot of peripherals such as Ethernet, CAN, UART, I2C, SPI , dual display, MIPI CSI-2 camera, and audio. Another interesting hardware feature is the standard Key E M.2 connector, simplifying Wifi and Bluetooth integration for IOT devices.
Deploying a redpeskOS image on this kind of board consists of copying a disk image on an SD card.
See the phyBOARD®-AM62x Development Kit specification on the Phytec website.
Download images
See Download Images section.
Download our Phytec phyBOARD®-AM62x image from command line
Create a directory to download the image:
mkdir ~/redpeskimage
cd ~/redpeskimage
Then download the latest redpesk OS image with this command:
wget -r -nd -nc --no-parent -A "redpesk*smack*" 'https://download.redpesk.bzh/redpesk-lts/batz-2.1-update/images/smack/minimal/aarch64/phytec/'
Control the image integrity
Before doing anything, please control the integrity of the downloaded redpesk image. Example:
sha256sum -c redpesk*.tar.xz.sha256

redpesk*aarch64*.tar.xz: OK
Copying the image on your SD card
Plug your SD card and find it (be sure it is unmounted)
Copy the correct device path using the command below. It should be a hotplug device.
lsblk -dli -o PATH,VENDOR,TYPE,HOTPLUG,MODEL
DEVICE_TO_COPY='/dev/<hotplug_device>' #in the example it is /dev/sdc
Example:
$ lsblk -dli -o PATH,VENDOR,TYPE,HOTPLUG,MODEL
PATH         VENDOR   TYPE HOTPLUG MODEL
/dev/sda     ATA      disk       0 WDC_WD10SPZX-08Z10
/dev/sdc     TS-RDF5  disk       1 SD_Transcend #MYSDCARD
/dev/nvme0n1          disk       0 LITEON T11 512
DEVICE_TO_COPY=/dev/sdc
Or if only one device is hotpluggable on your computer:
# need jq
DEVICE_TO_COPY=$(lsblk -dlJ -o PATH,VENDOR,TYPE,HOTPLUG,MODEL | jq -r '.blockdevices[] | select(.hotplug == true).path')
echo $DEVICE_TO_COPY
Umount if needed
lsblk $DEVICE_TO_COPY
# need to umount each partition
sudo umount <part*>
Example:
$ lsblk /dev/sdc
NAME   MAJ:MIN RM  SIZE RO TYPE MOUNTPOINT
sdc      8:32   1 14.6G  0 disk
├─sdc1   8:33   1  501M  0 part /run/media/iotbzh/0409-3A02
├─sdc2   8:34   1    1G  0 part /run/media/iotbzh/cd3c87ec-1011-4832-aef3-6be0ed3d3748
└─sdc3   8:35   1  2.5G  0 part /run/media/iotbzh/4e508264-8ce2-447f-a829-e4c31ea20047
$ sudo umount /run/media/iotbzh/*
Flash sdcard
Prerequisites: device is plugged in, found, unmounted
- Extract the image first
tar xJf redpesk*.tar.xz - Flash it using
ddsudo dd if="Redpesk-OS.img" of=$DEVICE_TO_COPY bs=4M status=progress - Or using bmaptool
bmaptool copy "Redpesk-OS.img" $DEVICE_TO_COPY
TIPS: Once you are used to flash your image, you could do it much faster in one single step using
bmaptoollike this:bmaptool copy "https://download.redpesk.bzh/redpesk-lts/batz-2.1-update/images/smack/minimal/aarch64/phytec/image.raw.tar.xz" $DEVICE_TO_COPYThis will download, control integrity and flash the latest redpesk OS image on your device.
Hardware DIP switch configuration
Integrated into the PCB, a DIP switch is generally present to allow you to choose between different boot mode.
| Boot mode (S5) | Switch 1 | Switch 2 | Switch 3 | Switch 4 | Switch 5 | Switch 6 | Switch 7 | Switch 8 |
|---|---|---|---|---|---|---|---|---|
| SD card | ON | ON | OFF | OFF | OFF | OFF | ON | OFF |
| eMMC | ON | ON | OFF | ON | OFF | OFF | ON | OFF |
| Boot mode (S6) | Switch 1 | Switch 2 | Switch 3 | Switch 4 | Switch 5 | Switch 6 | Switch 7 | Switch 8 |
|---|---|---|---|---|---|---|---|---|
| SD card | OFF | ON | OFF | OFF | OFF | OFF | OFF | OFF |
| eMMC | OFF | OFF | OFF | OFF | OFF | OFF | OFF | OFF |
For more boot information (Network, USB, UART, OSPI, JTAG…), please refer to the Phytec documentation.
Connect to the Phytec board
- Plug the SD card into the board.
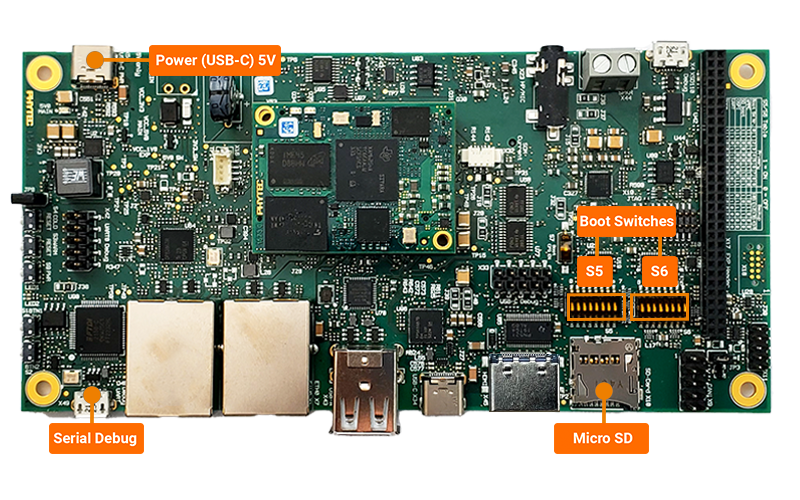
- Connect the USB-UART cable to the micro USB debug port.
- By default, the board will boot to the SD card. If you want to change the boot mode, please refer to the boot modes section.
- Power on the board (USB-C cable).
use
dmesgto see the name of the USB plugged[ 7.567111] usb 1-2.1.2: pl2303 converter now attached to ttyUSB1 -
Use picocom (or minicom depending on your tools!)
sudo picocom -b 115200 /dev/ttyUSB1NOTE: Default root password is
root. -
Getting the address of the board to be able to use a SSH connection
Connect an Ethernet cable between computer and the Phytec board.
 #on board
 ip -c a
# on computer ssh root@<ip_board>
Installing a package
Your board is now ready to boot redpesk OS. You can install any packages and/or your own packages.
Please refer to section Application deployment for more details.