Network access thanks to a cellular connection
Depending on your embedded project needs, sometimes you may want a network access. In a wireless environment, one solution is to use a cellular connection to give you Internet access.
Tested configurations
This guide was tested with redpesk OS Arz 1.1 and Batz 2.0 with the following boards:
| Board | Modem | redpesk OS | Kernel |
|---|---|---|---|
| Solidrun SolidSense N8 Compact Edge Gateway | Quectel EG25 | Arz 1.1 | 5.4.47 |
| Solidrun Hummingboard Pulse | Quectel EC25 | Arz 1.1, Batz 2.0 | 5.10.72 |
Requirements
Kernel configuration
The following kernel configuration is required for all boards:
CONFIG_USB_SERIAL_OPTION=y
CONFIG_PPP=y
CONFIG_PPP_ASYNC=y
CONFIG_PPP_SYNC_TTY=y
CONFIG_PPP_DEFLATE=y
The SolidSense seems to require more options:
CONFIG_PPP_BSDCOMP=y
CONFIG_PPP_FILTER=y
CONFIG_PPP_MPPE=y
CONFIG_PPP_MULTILINK=y
CONFIG_PPPOE=y
You can also add the following line to prevent the kernel from creating
a /dev/cdc-wm device (to talk to the modem in QMI) and a wwan
network interface which we won’t use since this guide uses PPP to talk
to the modem.
CONFIG_USB_NET_QMI_WWAN=n
Qualcomm MSM Interface is a proprietary protocol used to interact with Qualcomm baseband processors. Point-to-Point Protocol is a protocol for two routers to communicate without any intermediary.
If more kernel configuration is required, it should be specified in your modem’s documentation.
You can use this website for information about the kernel configuration.
Packages
NetworkManager comes by default in redpesk OS, but some of its extensions are required for LTE to work:
dnf install NetworkManager-ppp NetworkManager-wwan ModemManager
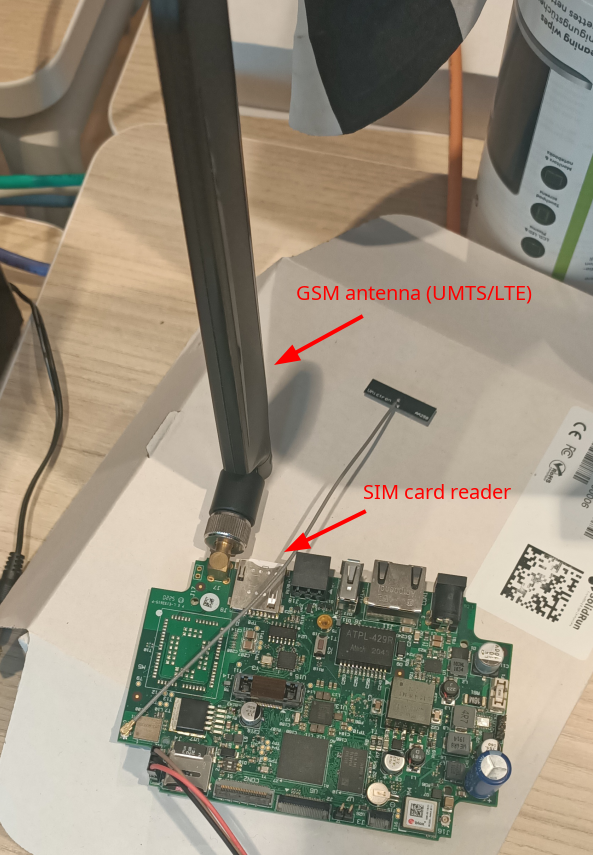
Hardware
Don’t forget to plug in your SIM card and GSM antenna!
Configure the network
There are two ways of configuring a cellular connection:
- setup a connection which holds all the data and will automatically come up after each reboot.
- setup a connection with minimal data, which provides more data protection since everything (the SIM’s PIN) isn’t saved to disk, but requires manual intervention after a reboot.
One-time magic command
The first step is to find which tty device corresponds to your modem. When everything is setup correctly, you should see a ttyUSB device in NetworkManager’s device list:
[root@localhost ~]# nmcli dev
DEVICE         TYPE      STATE                   CONNECTION
lo             loopback  connected (externally)  lo
ttyUSB2        gsm       disconnected            --         <<<<<
wlan0          wifi      disconnected            --
p2p-dev-wlan0  wifi-p2p  disconnected            --
enp1s0         ethernet  unavailable             --
eth0           ethernet  unavailable             --
You also need to know your carrier’s APN (may look like free or
live.vodafone.com) and your SIM’s PIN code. If your SIM is completely
unlocked, just remove the gsm.pin <PIN> option from the command.
Using this information, you can type in the following command which will
create a NetworkManager “connection” object which holds all the data.
Since we specify the autoconnect option, it will also setup your
connection and a ppp network device automatically (and after each
reboot):
[root@localhost ~]# nmcli connection add type gsm ifname ttyUSB2 autoconnect yes con-name quectel-lte apn <CARRIER APN> gsm.pin <SIM PIN>
Connection 'quectel-lte' (c8e809bb-1d68-4451-bd6e-d2b5e9a884cc) successfully added.
Manual setup
This part will detail some options of the nmcli connection add
command, explain how to remove some and manually do what they do. You
still need to know which ttyUSB device matches your modem by using the
command given in the previous section.
PIN code
The main thing you wouldn’t want to see written in your board’s memory
is the SIM’s PIN code. To remove it from persistent storage, you have to
remove the gsm.pin <SIM PIN> option from the command:
[root@localhost ~]# nmcli connection add type gsm ifname ttyUSB2 autoconnect yes con-name quectel-lte apn <CARRIER APN>
To unlock the SIM manually after boot, you need to go through ModemManager directly. List all modems to find the ID of yours:
[root@localhost ~]# mmcli -L
    /org/freedesktop/ModemManager1/Modem/0 [Quectel] EC25
We are interested in the number after Modem/, here the 0. Then
unlock the SIM by using its PIN code:
[root@localhost ~]# mmcli -i 0 --pin=<PIN>
successfully sent PIN code to the SIM
Under redpesk OS Batz 2.0, unlocking the SIM will change the modem’s and SIM’s IDs used by ModemManager. This means “all-in-one commands” like ModemManager’s
--simple-connectwon’t work properly. Usemmcli -Lagain to see the new ID.
-i 0does not designate the modem of ID 0, but the SIM of ID 0. You can find which SIM a modem uses inmmcli -m 0’s output, even though the modem’s ID and the SIM’s ID usually are the same.
Autoconnect
For debugging purposes you may want your device to not connect
automatically to a cellular network. You can then remove the
autoconnect yes option.
To manually launch the connection, you can use the following command:
[root@localhost ~]# nmcli device connect ttyUSB2
Device 'ttyUSB2' successfully activated with 'b4f9c35b-df79-49cc-b518-5a19bedc6a2b'.
NetworkManager knows which connection to use because you specified the
ifname option earlier. A disconnect subcommand also exists to
manually disconnect from a cellular network.
Test the connection
To validate the connection, you can try to reach 8.8.8.8 (which is a
public Google DNS server):
[root@localhost ~]# ping 8.8.8.8 -c 1
PING 8.8.8.8 (8.8.8.8) 56(84) bytes of data.
64 bytes from 8.8.8.8: icmp_seq=1 ttl=117 time=16.6 ms

--- 8.8.8.8 ping statistics ---
1 packets transmitted, 1 received, 0% packet loss, time 0ms
rtt min/avg/max/mdev = 16.598/16.598/16.598/0.000 ms
To test the bandwidth, you can try to download a test file of a given
size (wget will show you the download speed); you can find some on
this OVH service.
[root@localhost ~]# wget https://proof.ovh.net/files/10Mb.dat
--2024-01-22 17:29:51--  https://proof.ovh.net/files/10Mb.dat
Resolving proof.ovh.net (proof.ovh.net)... 141.95.207.211, 2001:41d0:242:d300::
Connecting to proof.ovh.net (proof.ovh.net)|141.95.207.211|:443... connected.
HTTP request sent, awaiting response... 200 OK
Length: 10485760 (10M) [application/octet-stream]
Saving to: ‘10Mb.dat’

10Mb.dat            100%[===================>]  10.00M   206KB/s    in 53s

2024-01-22 17:30:45 (193 KB/s) - ‘10Mb.dat’ saved [10485760/10485760]
Keep a ttyUSB device from being used by ModemManager (AT commands)
For some use cases you may need to manually send AT commands to your SIM
card. For that you have to identify which ttyUSB devices associated
with your modem can be used to send these commands:
[root@localhost ~]# mmcli -m 1
...
System |       device: /sys/devices/platform/soc@0/32f10108.usb/38200000.dwc3/xhci-hcd.3.auto/usb3/3-1/3-1.3
       |      drivers: option
       |       plugin: quectel
       | primary port: ttyUSB2
       |        ports: ttyUSB0 (qcdm), ttyUSB1 (gps), ttyUSB2 (at), ttyUSB3 (at)
...
As you can see, this modem can receive AT commands through ttyUSB2 or
ttyUSB3. But them being present in the result of this command means
that ModemManager already uses both these ports for its needs. We need
to tell ModemManager to ignore one of these two ports and leave it for
our own use. This is done through a udev rule.
Your cellular connection will still work properly with only one AT device available to ModemManager; but you won’t be able to use some ModemManager commands anymore once you are connected to the network (like the
3gpp-scanshown further down).
The udev rule needs to identify the modem (which usually is an USB
device, identifiable with a vendor ID and a product ID) and the
interface which provides the serial device (through an interface
number). It will then apply a label to this interface which will be read
by ModemManager and tell it not to use this interface.
To find the vendor and product IDs, you need to use lsusb:
[root@localhost ~]# lsusb
...
Bus 003 Device 003: ID 2c7c:0125 Quectel Wireless Solutions Co., Ltd. EC25 LTE modem
...
We see here that for our modem, the vendor ID is 2c7c and the product
ID 0125.
Then we need to identify the interface number. For that we can list the
/dev/serial/by-id directory:
[root@localhost ~]# ls -l /dev/serial/by-id
total 0
lrwxrwxrwx 1 root root 13 Jan 24 12:26 usb-Android_Android-if00-port0 -> ../../ttyUSB0
lrwxrwxrwx 1 root root 13 Jan 24 12:26 usb-Android_Android-if01-port0 -> ../../ttyUSB1
lrwxrwxrwx 1 root root 13 Jan 24 12:26 usb-Android_Android-if02-port0 -> ../../ttyUSB2
lrwxrwxrwx 1 root root 13 Jan 24 12:26 usb-Android_Android-if03-port0 -> ../../ttyUSB3
We would like ModemManager to ignore ttyUSB3, which corresponds to the
interface number 3 (see if03 on the ttyUSB3 line).
If this method of finding the interface number does not work, you can use
lsusb -v; in the sectionDevice descriptor > Configuration descriptoryou will see multipleInterface descriptoreach with abInterfaceNumber. You will need to guess and retry to find the correct interface number using this method.
We now have all our data. We can create a new udev rule: create a file
in /etc/udev/rules.d which name starts with 79- and extension is
.rules, according to the udev rules hierarchy (see sources). It will
contain the following rule (don’t forget to replace 2c7c with your
vendor ID, 0125 with your product ID and 03 with your interface
number):
ACTION!="add|change|move|bind", GOTO="mm_quectel_ec25_end"
SUBSYSTEMS=="usb", ATTRS{idVendor}=="2c7c", GOTO="mm_quectel_ec25"
GOTO="mm_quectel_ec25_end"

LABEL="mm_quectel_ec25"
# Store interface number in an env var
SUBSYSTEMS=="usb", ATTRS{bInterfaceNumber}=="?*", \
  ENV{.MM_USBIFNUM}="$attr{bInterfaceNumber}"
# USB iface #4 will be ignored
ATTRS{idVendor}=="2c7c", ATTRS{idProduct}=="0125", ENV{.MM_USBIFNUM}=="03", \
  SUBSYSTEM=="tty", ENV{ID_MM_PORT_IGNORE}="1"
LABEL="mm_quectel_ec25_end"
To apply the rule, you need to reboot. You should now see that the desired serial port is ignored by ModemManager:
[root@localhost ~]# mmcli -m 0
...
System   |       device: /sys/devices/platform/soc@0/32f10108.usb/38200000.dwc3/xhci-hcd.3.auto/usb3/3-1/3-1.3
         |      drivers: option
         |       plugin: quectel
         | primary port: ttyUSB3
         |        ports: ttyUSB0 (qcdm), ttyUSB1 (gps), ttyUSB2 (at),
         |               ttyUSB3 (ignored)
...
You are now able to send AT commands to ttyUSB3 using any serial
client.
Sources
- Sample udev rule in ModemManager’s documentation
- ModemManager udev labels
More useful commands
This section regroups many commands which can be useful if your connection isn’t working or you want to do more custom things.
List all information about a modem
Find out the modem number:
[root@localhost ~]# mmcli -L
    /org/freedesktop/ModemManager1/Modem/0 [Quectel] EC25
Depending on ModemManager’s version, the modem number can change when unlocking the SIM.
Get information; for debugging purposes, this is an example where the SIM is inserted and the modem is detected as such, but no configuration has been applied and the connection is not active:
[root@localhost ~]# mmcli -m 0
  -----------------------------
  General  |              path: /org/freedesktop/ModemManager1/Modem/0
           |         device id: b8719a38bd8ffb9d6d30c788984b08ded3ce21f3
  -----------------------------
  Hardware |      manufacturer: Quectel
           |             model: EC25
           | firmware revision: EC25EFAR06A03M4G
           |         supported: gsm-umts, lte
           |           current: gsm-umts, lte
           |      equipment id: 866758042316923
  -----------------------------
  System   |            device: /sys/devices/platform/soc@0/32f10108.usb/38200000.dwc3/xhci-hcd.3.auto/usb3/3-1/3-1.3
           |           drivers: option
           |            plugin: quectel
           |      primary port: ttyUSB2
           |             ports: ttyUSB0 (qcdm), ttyUSB1 (gps), ttyUSB2 (at), ttyUSB3 (at)
  -----------------------------
  Status   |              lock: sim-pin
           |    unlock retries: sim-pin (3), sim-puk (10), sim-pin2 (3), sim-puk2 (10)
           |             state: locked
           |       power state: on
  -----------------------------
  Modes    |         supported: allowed: 2g, 3g, 4g; preferred: none
           |           current: allowed: 2g, 3g, 4g; preferred: none
  -----------------------------
  IP       |         supported: ipv4, ipv6, ipv4v6
  -----------------------------
  3GPP     |     enabled locks: sim
  -----------------------------
  SIM      |  primary sim path: /org/freedesktop/ModemManager1/SIM/0
This is an example where the connection is setup and active, and the
udev rule to ignore a serial interface is active (only the sections
which differ compared to previous example are shown):
[root@localhost ~]# mmcli -m 1
  --------------------------------
  General  |                 path: /org/freedesktop/ModemManager1/Modem/1
           |            device id: b8719a38bd8ffb9d6d30c788984b08ded3ce21f3
...
  --------------------------------
  System   |               device: /sys/devices/platform/soc@0/32f10108.usb/38200000.dwc3/xhci-hcd.3.auto/usb3/3-1/3-1.3
           |              drivers: option
           |               plugin: quectel
           |         primary port: ttyUSB2
           |                ports: ttyUSB0 (qcdm), ttyUSB1 (gps), ttyUSB2 (at),
           |                       ttyUSB3 (ignored)
  --------------------------------
  Status   |       unlock retries: sim-pin (3), sim-puk (10), sim-pin2 (3), sim-puk2 (10)
           |                state: connected
           |          power state: on
           |          access tech: umts
           |       signal quality: 40% (recent)
...
  --------------------------------
  3GPP     |                 imei: 866758042316923
           |        enabled locks: sim
           |          operator id: 20815
           |        operator name: Free Free
           |         registration: home
           | packet service state: attached
  --------------------------------
  3GPP EPS | ue mode of operation: csps-2
  --------------------------------
  SIM      |     primary sim path: /org/freedesktop/ModemManager1/SIM/1
  --------------------------------
  Bearer   |                paths: /org/freedesktop/ModemManager1/Bearer/0
An unlocked (valid SIM PIN) but not connected yet modem shows an
enabling, then a registered state (and no Bearer section).
List SIM information
[root@localhost ~]# mmcli -i 1
  -------------------------------
  General    |              path: /org/freedesktop/ModemManager1/SIM/1
  -------------------------------
  Properties |            active: yes
             |              imsi: this is a quite sensitive piece of data
             |             iccid: that too
             |       operator id: 20815
             |     operator name: Free
             |              gid1: FFFFFFFF
             |              gid2: FFFFFFFF
Scan nearby antennas
The SIM has to be unlocked for this command to work.
[root@localhost ~]# mmcli -m 1 --3gpp-scan --timeout=300
  ---------------------
  3GPP scan | networks: 20815 - Free (lte, available)
            |           20815 - Free (umts, available)
            |           20801 - Orange F (umts, available)
            |           20801 - Free (gsm, available)
            |           20820 - F-Bouygues Telecom (umts, forbidden)
            |           20810 - F SFR (umts, forbidden)
            |           20801 - Orange F (lte, available)
            |           20810 - F SFR (gsm, forbidden)
            |           20810 - F SFR (lte, forbidden)
            |           20820 - F-Bouygues Telecom (gsm, forbidden)
            |           20820 - F-Bouygues Telecom (lte, forbidden)
            |           20816 - 208 16 (lte, available)
NetworkManager device status
Most NetworkManager commands can be shortened.
nmcli deviceandnmcli devare equivalent, whilestatusis the default subcommand ofnmcli devicesonmcli devandnmcli device statusare the same thing.
[root@localhost ~]# nmcli dev
DEVICE         TYPE      STATE                   CONNECTION
wlan0          wifi      connected               IoTBZH
lo             loopback  connected (externally)  lo
ttyUSB2        gsm       disconnected            --
p2p-dev-wlan0  wifi-p2p  disconnected            --
enp1s0         ethernet  unavailable             --
eth0           ethernet  unavailable             --
From a cold start, with a fully automatic connection process,
ttyUSB2’s status will go through these steps:
- the device will be non-existent for a few seconds after boot
disconnectedconnecting (prepare)- then it may disappear again while the SIM is unlocked because the modem’s ID changes
connecting (prepare)connecting (configuring)connected
If you chose not to save the SIM’s PIN to persistent storage with the
gsm.pin option when adding a NetworkManager connection, the ttyUSB
device status will at some point be connecting (need authentication).
You will need to unlock the SIM with mmcli -i 0 --pin=<PIN> for
NetworkManager to continue the connection process.
Modify some connection’s options
To avoid deleting and re-adding a NetworkManager every time you want to make a change, you can just modify the connection:
[root@localhost ~]# nmcli connection modify quectel-lte autoconnect no
Check the network interfaces and their IP addresses
This is the output of a successfully configured cellular connection through PPP:
[root@localhost ~]# ip a
...
5: ppp0: <POINTOPOINT,MULTICAST,NOARP,UP,LOWER_UP> mtu 1500 qdisc pfifo_fast state UNKNOWN group default qlen 3
    link/ppp
    inet 10.13.235.249 peer 10.64.64.64/32 scope global ppp0
       valid_lft forever preferred_lft forever
    inet 10.13.235.249/32 scope global noprefixroute ppp0
       valid_lft forever preferred_lft forever
    inet6 fe80::7093:af04:2eea:ac89 peer fe80::f467:a9ea:44d9:edba/64 scope link noprefixroute
       valid_lft forever preferred_lft forever
    inet6 fe80::e34b:4390:ac04:3e02/64 scope link noprefixroute
       valid_lft forever preferred_lft forever
Connections configured using QMI are different, they use a
wwanXinterface automatically created by the kernel &udevwhen the QMI driver is present