Deploying and running a redpesk OS image on solidrun-edge-gateway N8 IoT Compact board
SolidSense edge gateway N8 compact is a SolidRun board. This board is a low cost, deployment focused edge IoT gateway allowing you to create and manage your infrastructure for IoT applications. With broad connectivity options and expansion option to support customer specific requirements the N8 Compact is engineered with flexibility, cost effectiveness and modularity in mind.
Deploying a redpesk OS image on this kind of board consists of copying a disk image on an SD card.
See SolidSense specification for N8 IoT Compact on SolidRun website.
Download images
See Download Images section.
Download the redpesk OS image from command line
Create a directory to download the image:
mkdir ~/redpeskimage
cd ~/redpeskimage
Then download the latest redpesk OS image with this command:
wget -r -nd -nc --no-parent --accept-regex='redpesk.*smack.*\.(bmap|xz|sha256)' --reject-regex '(image\.raw|ova|index)' 'https://download.redpesk.bzh/redpesk-lts/batz-2.1-update/images/smack/minimal/aarch64/solidrun-edge-gateways/'
Control the image integrity
Before doing anything, please control the integrity of the downloaded redpesk image. Example:
sha256sum -c redpesk*.tar.xz.sha256
redpesk*aarch64*.tar.xz: OK
Copying the image on your SD card
Plug your SD card and find it (be sure it is unmounted)
Copy the correct device path using the command below. It should be a hotplug device.
lsblk -dli -o PATH,VENDOR,TYPE,HOTPLUG,MODEL
DEVICE_TO_COPY='/dev/<hotplug_device>' #in the example it is /dev/sdc
Example:
$ lsblk -dli -o PATH,VENDOR,TYPE,HOTPLUG,MODEL
PATH         VENDOR   TYPE HOTPLUG MODEL
/dev/sda     ATA      disk       0 WDC_WD10SPZX-08Z10
/dev/sdc     TS-RDF5  disk       1 SD_Transcend #MYSDCARD
/dev/nvme0n1          disk       0 LITEON T11 512
DEVICE_TO_COPY=/dev/sdc
Or if only one device is hotpluggable on your computer:
# need jq
DEVICE_TO_COPY=$(lsblk -dlJ -o PATH,VENDOR,TYPE,HOTPLUG,MODEL | jq -r '.blockdevices[] | select(.hotplug == true).path')
echo $DEVICE_TO_COPY
Umount if needed
lsblk $DEVICE_TO_COPY
# need to umount each partition
sudo umount <part*>
Example:
$ lsblk /dev/sdc
NAME   MAJ:MIN RM  SIZE RO TYPE MOUNTPOINT
sdc      8:32   1 14.6G  0 disk
├─sdc1   8:33   1  501M  0 part /run/media/iotbzh/0409-3A02
├─sdc2   8:34   1    1G  0 part /run/media/iotbzh/cd3c87ec-1011-4832-aef3-6be0ed3d3748
└─sdc3   8:35   1  2.5G  0 part /run/media/iotbzh/4e508264-8ce2-447f-a829-e4c31ea20047
$ sudo umount /run/media/iotbzh/*
Flash the SD card
Prerequisites: device is plugged in, found, unmounted
- First, extract the image
tar xJf redpesk*.tar.xz - Then, flash it using
dd(safer)sudo dd if="Redpesk-OS.img" of=$DEVICE_TO_COPY bs=4M status=progress - Or using bmaptool (faster)
bmaptool copy "Redpesk-OS.img" $DEVICE_TO_COPY
TIPS: Once your are used to flash your image, you could do it much faster in one single step using
bmaptoollike this:bmaptool copy "https://download.redpesk.bzh/redpesk-lts/batz-2.1-update/images/smack/minimal/aarch64/solidrun-edge-gateways/image.raw.tar.xz" $DEVICE_TO_COPYThis will download, control integrity and flash the latest redpesk OS image on your device.
Hardware DIP switch configuration
Integrated into the PCB, a DIP switch is generally present to allow you to choose between different boot mode.
For the SolidRun Edge N8 IoT Compact Gateway, here is the following configuration:
| Boot mode (S1) | Switch 1 | Switch 2 |
|---|---|---|
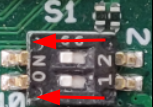
| SD card | ON | ON |
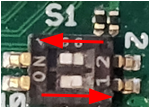
| eMMC | OFF | ON |
For more hardware information (like connections, button functions or led status), please refer to the SolidRun documentation.
Connect to the SolidSense N8 IoT Compact

- Plug in the SD Card into the board.
- Be sure to have your boot switch (S1) set to SD boot configuration (pin 1 & 2 = ON) :

- Power on the board.
-
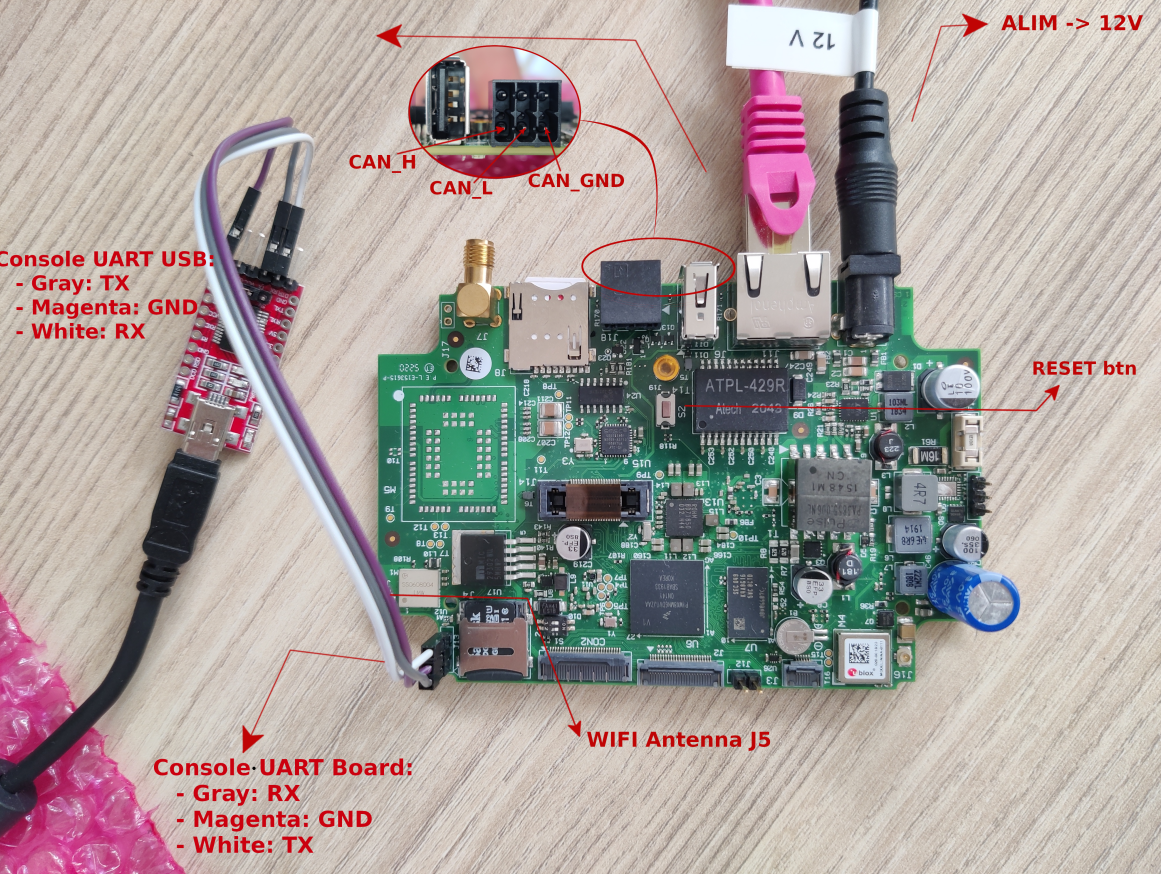
Connect the USB-UART cable following the three pins beside the SD card socket. Use
dmesgto see the name of the USB plugged on your PC.[ 7.567111] usb 1-2.1.2: pl2303 converter now attached to ttyUSB1 -
Use picocom to connect to the serial
sudo picocom -b 115200 /dev/ttyUSB1NOTE: Default root password is
root. -
Get the address of the board to be able to use an SSH connection
Connect your board to your network with an Ethernet cable
 #on board
 ip -c a
# on computer ssh root@<ip_board>
Run redpesk on the eMMC (optional)
For system life time, it is better to run the OS from eMMC instead of the SD card. On SolidRun boards, eMMC is not available without having a running system (like a linux based OS). So you first need to boot a redpesk-OS from the SD card and connect. Then you will be able to manage the eMMC and flash redpesk.
Flash the eMMC from the SD
To flash the eMMC on the SolidRun board, first run redpesk OS from the SD, connect and run the following command :
dd if=/dev/disk/by-path/platform-30b50000.mmc of=/dev/disk/by-path/platform-30b60000.mmc conv=fsync,noerror bs=4M status=progress
Once finished, power off the board and remove the SD card.
Change the boot device (from SD to eMMC)
Once the eMMC is flashed, you need to change uboot environment to boot on eMMC. So first, power on the solidrun and stop the boot in uboot:
U-Boot SPL 2020.04 (Oct 13 2022 - 16:11:25 +0200)
power_bd71837_init
DDRINFO: start DRAM init
DDRINFO: DRAM rate 2400MTS
DDRINFO:ddrphy calibration done
DDRINFO: ddrmix config done
Normal Boot
Trying to boot from BOOTROM
image offset 0x8000, pagesize 0x200, ivt offset 0x0
NOTICE:  BL31: v2.2(release):
NOTICE:  BL31: Built : 15:15:41, Oct 13 2022


U-Boot 2020.04 (Oct 13 2022 - 16:11:25 +0200)

CPU:   i.MX8MNano Quad rev1.0 1500 MHz (running at 1200 MHz)
CPU:   Commercial temperature grade (0C to 95C) at 53C
Reset cause: POR
Model: SolidRun i.MX8MN Compact
DRAM:  1 GiB
MMC:   FSL_SDHC: 1, FSL_SDHC: 2
Loading Environment from MMC... OK
Fail to setup video link
In:    serial
Out:   serial
Err:   serial

 BuildInfo:
  - ATF
  - U-Boot 2020.04

switch to partitions #0, OK
mmc1 is current device
Device already have a valid MAC -> $ethaddr=0a:2a:f7:74:5c:15
flash target is MMC:1
Net:
Warning: ethernet@30be0000 MAC addresses don't match:
Address in ROM is          87:a9:62:91:43:ee
Address in environment is  0a:2a:f7:74:5c:15
eth0: ethernet@30be0000
Fastboot: Normal
Normal Boot
Hit any key to stop autoboot:  0                            <== HIT ANY KEY HERE
u-boot=>
Then change the following variable using this two commands :
u-boot=> editenv mmcdev
edit: 1
edit: 2                             <== Change the previous line with this line
u-boot=>
u-boot=> editenv mmcroot
edit: /dev/mmcblk1p4 rootwait rw
edit: /dev/mmcblk2p4 rootwait rw    <== Change the previous line with this line
u-boot=> saveenv                    <== Save the new environment
Saving Environment to MMC... Writing to MMC(1)... OK
u-boot=>
Once done,
- Power off the board
- Remove the SD card from the SolidRun !
- Change the boot mode to boot on eMMC = switch pin 1 of dual DIP switch S1 to OFF :

- Power on the board
NOTE: These steps are mandatory as the eMMC will now contain the bootloader and the same partitions’ UUID as the ones on the SD card.
Installing a package
Your board is now ready to boot redpesk OS. You can install any packages and/or your own packages.
Please refer to section Application deployment for more details.