Trusted Boot experiments within redpesk OS
Each embedded hardware manufacturer has different uses of the Secure Boot implementation. Obviously depending on the architecture (for now IoT.bzh is only working on ARM & x86 based SoCs), it requests important knowledge for advanced security use. Usually, each board has its own documentation to correctly use all possible features of the board. During our development phase on redpesk OS support on different boards, we noticed that it’s complicated to have a generic secure boot method. For the moment, we’ve been testing the Secure Boot deployment within redpesk OS on the NXP i.MX8 QuadXPlus MEK and the Boundary Devices Nitrogen 8M Nano. More coming soon!
- Experiencing the ARM Trusted Boot (64 bits) with redpesk OS:
Although these additions are still under development, the IoT.bzh team can implement more features on demand.
Verified Boot on the NXP i.MX8 QuadXPlus MEK
General concepts about the NXP implementation
To understand the secure architecture of the i.MX8 processor, you can have a better idea of the boot-flow thanks to the NXP documentation.
Executing trusted and authentic code starts with securely booting the device. The i.MX family of application processors provides this capability with the Advanced High Assurance Boot (AHAB) component on the on-chip ROM and the Security Controller (SECO) Firmware. The AHAB (only supported on i.MX 8 and i.MX 8X families) in ROM is responsible for authenticating the SECO firmware (NXP signed), which supplies services for authenticating images signed by the user to the System Controller ROM. It employs more advanced encryption and digital signature techniques. Additionally, the AHAB uses hardware controllers such as SCU and SECO. The SCU (System Controller) handles the interface with the boot support, managing the firmware and software image loading process into different partitions of the SoC. The SECO (Security Controller) is responsible for authenticating images and allowing their execution.
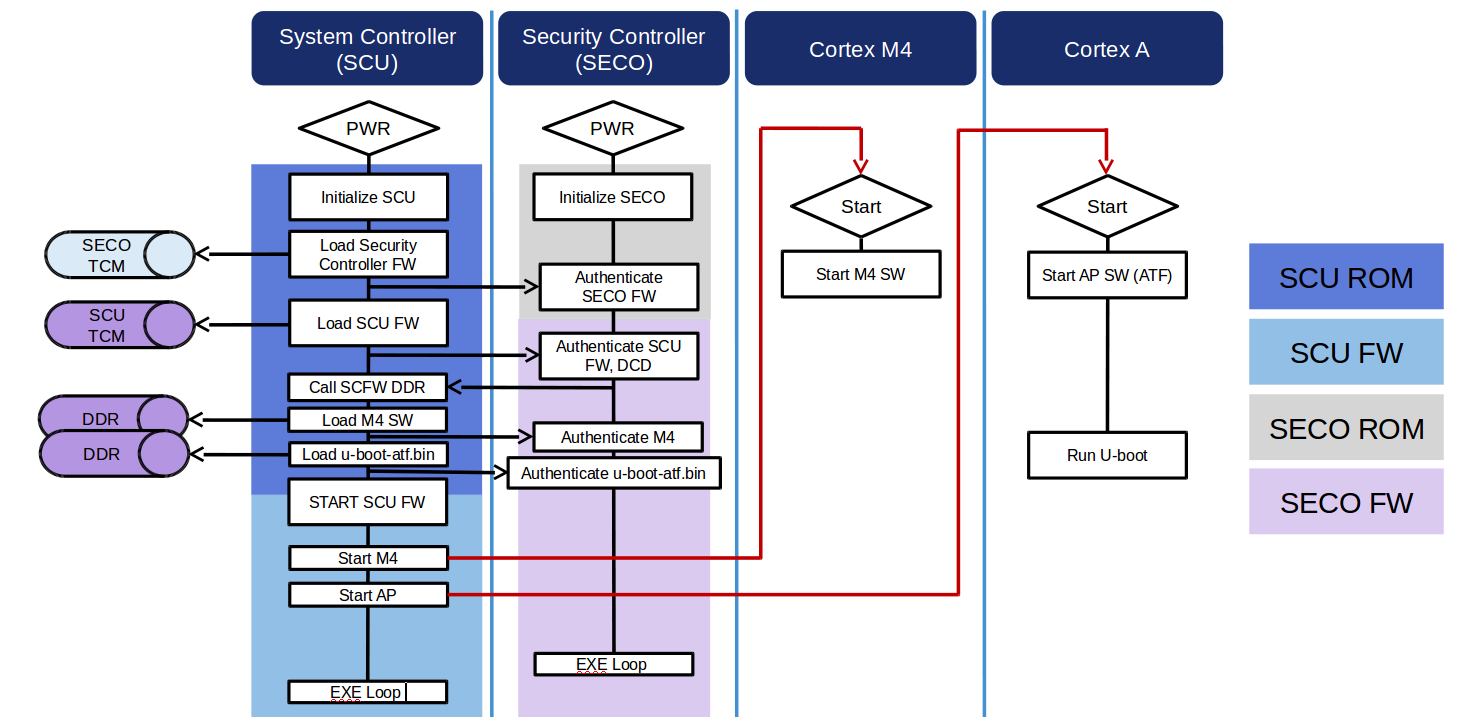
The i.MX8 and i.MX8x family of application processors introduce a new Secure Boot concept. Due to the multi-core architecture the Security Controller (SECO) and System Control Unit (SCU) are heavily involved in the secure boot process. The AHAB secure boot feature relies on digital signatures to prevent unauthorized software execution during the device boot sequence. The AHAB authentication is based on public key cryptography in which image data is signed offline using one or more private keys. The resulting signed image data is then verified on the i.MX processor using the corresponding public keys. The public keys are included in the final binary and the SRK Hash (Super Root Key equals the start of the authentication chain) is programmed in the SoC fuses to establish the root of trust.
On i.MX 8 and i.MX 8X families, the SCU is responsible for interfacing with the boot media, managing the process of loading the firmware and software images in different partitions of the SoC. The SECO (SEcurity COntroller) is charged with authenticating the images, authorizing the execution of them.
The sequence below explains the i.MX8 and i.MX8x boot flow as represented by the figure above:
- At reset, the SCU ROM and SECO ROM both start execution.
- The SCU ROM reads the boot configuration and loads the SECO FW (First container/rom the boot media to the SECO TCM).
- A message is sent by the SCU ROM requesting the SECO ROM to authenticate the SECO FW which is signed using NXP key.
- The SCU ROM loads the second container from the boot media, this container must contain at least the SCFW which is signed using the OEM keys.
- The SCU ROM loads the SCFW to the SCU TCM, a message is sent requesting the SECO FW to authenticate the SCFW and DCD table.
- The SCU ROM configures the DDR and loads the M4 and AP images included in the second container to their respective load addresses.
- The SCU ROM requests the SECO FW to authenticate the M4 image.
- The SCU ROM requests the SECO FW to authenticate the AP image. This image is the initial AP core software, depending on the U-Boot target it can be the U-Boot and ATF or only SPL.
- The SCFW is initialized and starts the ARM Cortex-M and Cortex-A cores.
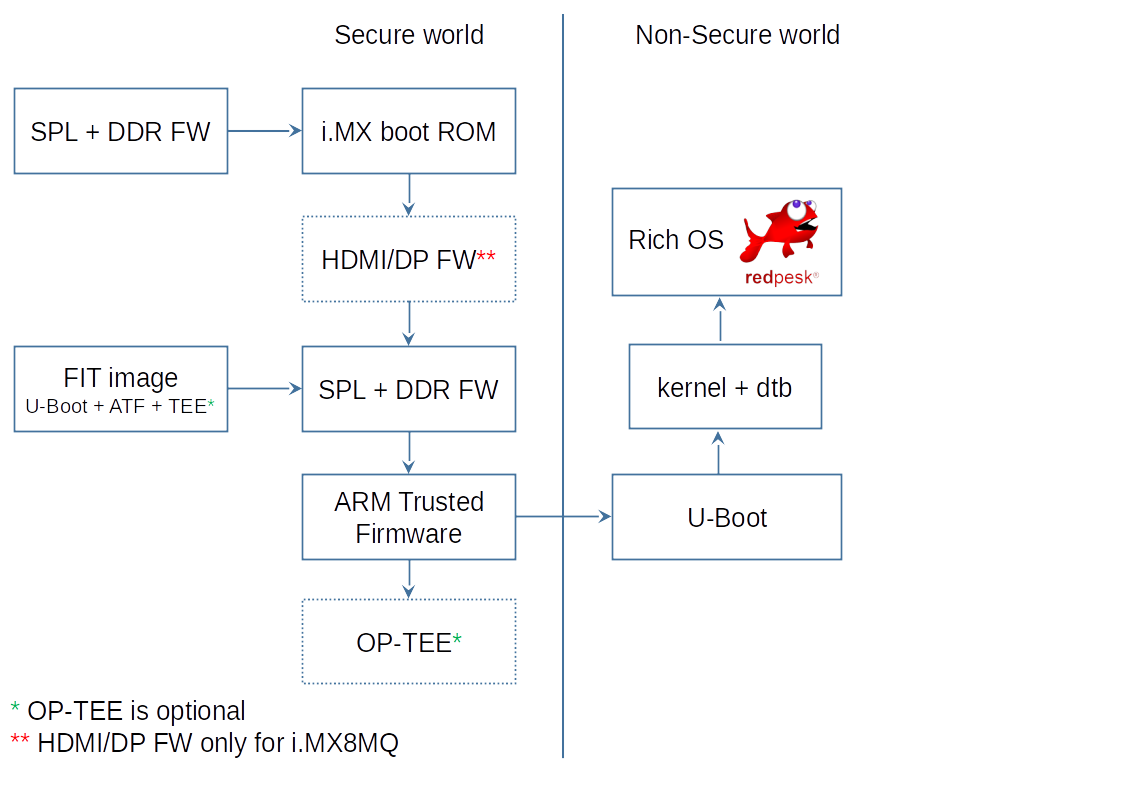
- From this point additional containers can be loaded by Cortex-M and Cortex-A cores and authenticated by SECO, the AP SW must interface with SCU by calling the sc_misc_seco_authenticate() API function. In current U-Boot implementation the additional image can be the Linux Kernel binary or the U-Boot proper and ATF.
Practicing the Verified Boot
For our tests, we only did the Verified Boot on this board. This consists of trusting the boot chain from the bootloader (U-Boot) to the kernel. Later, we’ll use the completed chain to have a real Secure Boot chain like the NXP manufacturer has designed it. Another step is to use dm-verity or other features from the kernel to be sure of the rootfs integrity.
Sources:
https://u-boot.readthedocs.io/en/latest/usage/fit/verified-boot.html
https://github.com/u-boot/u-boot/tree/master/doc/imx/ahab/guides
Verifying the kernel / dtb integrity thanks to a U-Boot’s fitImage
For this lab, we’re based on U-Boot v2021.04 because we only want to test the Verified Boot. If you want to have the full NXP Secure Boot implementation, please follow the needed installation phase before. For a simple Verified Boot without the Secure Boot, you’ll only need to have the kernel image, the device tree blob (.dtb) and a rootfs to boot.
First of all, in this section we’ll use ext4load command but you can use the load command (both fat32 and ext4load) if you have added the CONFIG_CMD_FS_GENERIC=y in U-boot config. To deploy an encrypted boot image, some U-Boot tools are needed.
Please be sure to have the following features enabled if you want the completed Secure Boot with the AHAB, this can be achieved by following one of the methods below:
- Defconfig:

CONFIG_AHAB_BOOT=y
CONFIG_CMD_DEKBLOB=y
CONFIG_IMX_SECO_DEK_ENCAP=y
CONFIG_FAT_WRITE=y

- Kconfig:

ARM architecture -> Support i.MX8 AHAB features
ARM architecture -> Support the 'dek_blob' command
File systems -> Enable FAT filesystem support-> Enable FAT filesystem
write support
However, for a simple Verified Boot method, these packages could be useful if you don’t have it yet (e.g. Debian packages):
sudo apt-get install libssl-dev openssl
In U-boot, to use signed Fit Image, we need to activate some things:
CONFIG_FIT=y
CONFIG_FIT_SIGNATURE=y
CONFIG_FIT_VERBOSE=y
Moreover, don’t forget to regenerate the tool:
make tools
That’s why you can use the mkimage signing tool:
$ ./tools/mkimage --help
Usage: ./tools/mkimage -l image
        -l ==> list image header information
    ./tools/mkimage [-x] -A arch -O os -T type -C comp -a addr -e ep -n name -d data_file[:data_file...] image
        -A ==> set architecture to 'arch'
        -O ==> set operating system to 'os'
        -T ==> set image type to 'type'
        -C ==> set compression type 'comp'
        -a ==> set load address to 'addr' (hex)
        -e ==> set entry point to 'ep' (hex)
        -n ==> set image name to 'name'
        -d ==> use image data from 'datafile'
        -x ==> set XIP (execute in place)
    ./tools/mkimage [-D dtc_options] [-f fit-image.its|-f auto|-F] [-b <dtb> [-b <dtb>]] [-E] [-B size] [-i <ramdisk.cpio.gz>] fit-image
        <dtb> file is used with -f auto, it may occur multiple times.
        -D => set all options for device tree compiler
        -f => input filename for FIT source
        -i => input filename for ramdisk file
        -E => place data outside of the FIT structure
        -B => align size in hex for FIT structure and header
Signing / verified boot options: [-k keydir] [-K dtb] [ -c <comment>] [-p addr] [-r] [-N engine]
        -k => set directory containing private keys
        -K => write public keys to this .dtb file
        -c => add comment in signature node
        -F => re-sign existing FIT image
        -p => place external data at a static position
        -r => mark keys used as 'required' in dtb
        -N => openssl engine to use for signing
    ./tools/mkimage -V ==> print version information and exit
Use '-T list' to see a list of available image types
Here is the method to generate the certificate. We could use the same for the PKI tree and the U-boot fitImage but for better security aspects, it’ll be better to distinguish both of them. For our experiments, it could be possible to use the IoT.bzh certificate.
# Generate a private key
openssl genpkey -algorithm RSA -out keys/dev-redpesk.key -pkeyopt rsa_keygen_bits:2048
# Generate a certificate
openssl req -batch -new -x509 -key keys/dev-redpesk.key -out keys/dev-redpesk.crt
# Generate a public key
openssl rsa -pubout -in keys/dev-redpesk.key -out keys/dev-redpesk.pem
Newer version of the dtc doesn’t authorize @ symbol instead of - symbol that’s why we have the following Fit Image format:
/dts-v1/;

/ {
    description = "fitImage signed for the redpesk image";
    #address-cells = <1>;

        images {
        kernel {
            description = "redpesk i.MX8 based on Linux kernel 5.10";
            data = /incbin/("Image");
            type = "kernel";
            arch = "arm64";
            os = "linux";
            compression = "none";
            load = <0x80280000>;
            entry = <0x80280000>;
            hash {
                algo = "sha256";
            };
        };

        fdt {
            description = "Flattened Device Tree blob";
            data = /incbin/("./imx8qxp-mek.dtb");
            type = "flat_dt";
            arch = "arm64";
            compression = "none";
            load = <0x83000000>;
            hash {
                algo = "sha256";
            };
        };
    };

    configurations {
        default = "conf";
        conf {
            description = "configuration 1 (Kernel & dtb)";
            kernel = "kernel";
            fdt = "fdt";
            signature {
                algo="sha256,rsa4096";
                key-name-hint = "dev-redpesk";
                sign-images = "fdt", "kernel";
            };
        };
    };
};
Then the goal is to use tools/mkimage to create the fitImage based on what we previously configured.
$ ../tools/mkimage -f fitImage-signed-conf.its -K imx8qxp-mek-with-pubkey.dtb -k keys -r fitImage
FIT description: fitImage signed for the redpesk image
Created:         Mon Apr 24 15:12:28 2023
Image 0 (kernel)
Description:  redpesk i.MX8 based on Linux kernel 5.10
Created:      Mon Apr 24 15:12:28 2023
Type:         Kernel Image
Compression:  uncompressed
Data Size:    30736896 Bytes = 30016.50 KiB = 29.31 MiB
Architecture: AArch64
OS:           Linux
Load Address: 0x80280000
Entry Point:  0x80280000
Hash algo:    sha256
Hash value:   fdda2bcfc4d76ff2536d8f3984a205642db0ffa0019150f2434b7b832b42b99c
Image 1 (fdt)
Description:  Flattened Device Tree blob
Created:      Mon Apr 24 15:12:28 2023
Type:         Flat Device Tree
Compression:  uncompressed
Data Size:    101346 Bytes = 98.97 KiB = 0.10 MiB
Architecture: AArch64
Load Address: 0x83000000
Hash algo:    sha256
Hash value:   4b1f34ecc2d9ddef20fac05966ab61c906958623626f39504c983019efd08160
Default Configuration: 'conf'
Configuration 0 (conf)
Description:  configuration 1 (Kernel & dtb)
Kernel:       kernel
FDT:          fdt
Sign algo:    sha256,rsa4096:dev-redpesk
Sign value:   59a9c68abdcd0732378c34448f104ce5fb49dcb1020382f47f17f9e781744ea95919803515a588f2871dc2cf551fedef0c2f9b54477ab2a5404975583ab38090fc154d2ac7b2f8b5b24878d72cb9abde875e3f9bacf89f1501a5ce0a916299db3bd692f818793b69f1f252cc6780cce10991c3acfa66a98611ddc17965ee7a7c2204285da1b57c30b64a700d17409b41a982e326a8faa83ae127f87ba8c3eb07d584a9b40b02acbd050183c2f493927c18f6e45bbff752dcf08a2851ce0ffb2b3d52fe11548ad43910bbd2eda621a31288c5ad4157dbc8a4d8017b8195b90b4e9d62b98ca451bdbada4da0766b7ed8c7bface2dbce90cff6e840c13c4225f4f7
Timestamp:    Mon Apr 24 15:12:28 2023
Each configuration node has been signed with SHA-256. To prevent mix-match attacks, we signed the configuration of the fitImage so that means we have signed both hashes of the kernel and the device tree.
=> ext4load mmc 1:1 0xD2000000 fitImage
30840186 bytes read in 329 ms (89.4 MiB/s)
=> setenv bootargs console=${console},${baudrate} earlycon root=${mmcroot} security=smack
=> bootm 0xD2000000
## Loading kernel from FIT Image at d2000000 ...
Using 'conf' configuration
Verifying Hash Integrity ... OK
Trying 'kernel' kernel subimage
    Description:  redpesk i.MX8 based on Linux kernel 5.10
    Type:         Kernel Image
    Compression:  uncompressed
    Data Start:   0xd20000f0
    Data Size:    30736896 Bytes = 29.3 MiB
    Architecture: AArch64
    OS:           Linux
    Load Address: 0x80280000
    Entry Point:  0x80280000
    Hash algo:    sha256
    Hash value:   f5eab6812de602cd97d9ede1b4efe4806c877630ec3ac640167484d4afa9a723
Verifying Hash Integrity ... sha256+ OK
## Loading fdt from FIT Image at d2000000 ...
Using 'conf' configuration
Verifying Hash Integrity ... OK
Trying 'fdt' fdt subimage
    Description:  Flattened Device Tree blob
    Type:         Flat Device Tree
    Compression:  uncompressed
    Data Start:   0xd3d503f0
    Data Size:    101346 Bytes = 99 KiB
    Architecture: AArch64
    Load Address: 0x83000000
    Hash algo:    sha256
    Hash value:   4b1f34ecc2d9ddef20fac05966ab61c906958623626f39504c983019efd08160
Verifying Hash Integrity ... sha256+ OK
Loading fdt from 0xd3d503f0 to 0x83000000
Booting using the fdt blob at 0x83000000
Loading Kernel Image
Using Device Tree in place at 0000000083000000, end 000000008301bbe1
Disable clock-controller@5a4d0000 rsrc 62 not owned
Disable clock-controller@5ac90000 rsrc 102 not owned
Disable clock-controller@585a0000 rsrc 411 not owned

Starting kernel ...

[    0.000000] Booting Linux on physical CPU 0x0000000000 [0x410fd042]
[    0.000000] Linux version 5.10.72-6.bsp.imx8.rparz.aarch64 (mockbuild@6d5f04571492471aa042d7f13b0dea3e) (aarch64-linux-gnu-gcc (GCC) 8.4.1 20200928 (Red Hat Cross 8.4.1-13), GNU ld version 2.30-9.redpesk.toolchain.rparz) #1 SMP PREE2
[    0.000000] Machine model: Freescale i.MX8QXP MEK
Well done, the Verified Boot is done but you can improve it with an automatic Uboot script!
# This script is used to switch between both booting methods: secure (fitImage) and no-secure based on the variable rp_sec_boot

# The 0xD2000000 address corresponds to first free place to put the fitImage
setenv fit_addr_r 0xD2000000

# setting the bootargs again
setenv bootargs console=${console},${baudrate} earlycon root=${mmcroot} security=smack

if test "${rp_secure_boot}" = "yes"; then
    # message as a reminder
    echo "Secure Mode enabled"
    echo "The kernel Image and the device tree integrity will be verified"
    # loading the fitImage
    ext4load mmc 1:1 ${fit_addr_r} fitImage
    # using of the bootm command
    bootm ${fit_addr_r}

else
    # message as a reminder
    echo "Secure Mode disabled"
    # kernel + device tree booting
    ext4load mmc 1:1 ${loadaddr} Image
    ext4load mmc 1:1 ${fdt_addr} imx8qxp-mek.dtb
    booti ${loadaddr} - ${fdt_addr}
fi
Now we can build it thanks to the mkimage tool:
$ ../tools/mkimage -A arm -C none -T script -O u-boot -n "Redpesk trusted boot script" -d switch-boot.txt boot.scr
Image Name:   Redpesk trusted boot script
Created:      Tue May  2 16:11:50 2023
Image Type:   ARM U-Boot Script (uncompressed)
Data Size:    848 Bytes = 0.83 KiB = 0.00 MiB
Load Address: 00000000
Entry Point:  00000000
Contents:
Image 0: 840 Bytes = 0.82 KiB = 0.00 MiB
Testing on the board:
Environment size: 4053/8188 bytes
=> load mmc 1:1 0xD2000000 boot.scr
912 bytes read in 2 ms (445.3 KiB/s)
=> md 0xD2000000
d2000000: 56190527 e0cc3f90 5e115164 50030000    '..V.?..dQ.^...P
d2000010: 00000000 00000000 f0e050f3 00060211    .........P......
d2000020: 70646552 206b7365 73757274 20646574    Redpesk trusted
d2000030: 746f6f62 72637320 00747069 00000000    boot script.....
d2000040: 48030000 00000000 68542023 73207369    ...H....# This s
d2000050: 70697263 73692074 65737520 6f742064    cript is used to
d2000060: 69777320 20686374 77746562 206e6565     switch between
d2000070: 68746f62 6f6f6220 676e6974 74656d20    both booting met
d2000080: 73646f68 6573203a 65727563 69662820    hods: secure (fi
d2000090: 616d4974 20296567 20646e61 732d6f6e    tImage) and no-s
d20000a0: 72756365 61622065 20646573 74206e6f    ecure based on t
=> editenv switch_sec_boot
edit: yes
=> source 0xD2000000
## Executing script at d2000000
Secure Mode enabled
The kernel Image and the device tree integrity will be verified
30840186 bytes read in 329 ms (89.4 MiB/s)
## Loading kernel from FIT Image at d2000000 ...
Using 'conf' configuration
Verifying Hash Integrity ... OK
Trying 'kernel' kernel subimage
    Description:  redpesk i.MX8 based on Linux kernel 5.10
    Type:         Kernel Image
    Compression:  uncompressed
    Data Start:   0xd20000f0
    Data Size:    30736896 Bytes = 29.3 MiB
    Architecture: AArch64
    OS:           Linux
    Load Address: 0x80280000
    Entry Point:  0x80280000
    Hash algo:    sha256
    Hash value:   f5eab6812de602cd97d9ede1b4efe4806c877630ec3ac640167484d4afa9a723
Verifying Hash Integrity ... sha256+ OK
## Loading fdt from FIT Image at d2000000 ...
Using 'conf' configuration
Verifying Hash Integrity ... OK
Trying 'fdt' fdt subimage
    Description:  Flattened Device Tree blob
    Type:         Flat Device Tree
    Compression:  uncompressed
    Data Start:   0xd3d503f0
    Data Size:    101346 Bytes = 99 KiB
    Architecture: AArch64
    Load Address: 0x83000000
    Hash algo:    sha256
    Hash value:   4b1f34ecc2d9ddef20fac05966ab61c906958623626f39504c983019efd08160
Verifying Hash Integrity ... sha256+ OK
Loading fdt from 0xd3d503f0 to 0x83000000
Booting using the fdt blob at 0x83000000
Loading Kernel Image
Using Device Tree in place at 0000000083000000, end 000000008301bbe1
Disable clock-controller@5a4d0000 rsrc 62 not owned
Disable clock-controller@5ac90000 rsrc 102 not owned
Disable clock-controller@585a0000 rsrc 411 not owned

Starting kernel ...
[    0.000000] Booting Linux on physical CPU 0x0000000000 [0x410fd042]
[    0.000000] Linux version 5.10.72-6.bsp.imx8.rparz.aarch64 (mockbuild@6d5f04571492471aa042d7f13b0dea3e) (aarch64-linux-gnu-gcc (GCC) 8.4.1 20200928 (Red Hat Cross 8.4.1-13), GNU ld version 2.30-9.redpesk.toolchain.rparz) #1 SMP PREE2
[    0.000000] Machine model: Freescale i.MX8QXP MEK
If you want to switch to the “normal” boot, the only thing is to change the rp_sec_boot variable.
=> load mmc 1:1 0xD2000000 boot.scr
912 bytes read in 2 ms (445.3 KiB/s)
=> source 0xD2000000
## Executing script at d2000000
Secure Mode disabled
switch to partitions #0, OK
mmc1 is current device
** Unrecognized filesystem type **
Can't set block device
30736896 bytes read in 469 ms (62.5 MiB/s)
Booting from mmc ...
101346 bytes read in 3 ms (32.2 MiB/s)
Moving Image from 0x80280000 to 0x80400000, end=82270000
## Flattened Device Tree blob at 83000000
Booting using the fdt blob at 0x83000000
Using Device Tree in place at 0000000083000000, end 000000008301bbe1
Disable clock-controller@5a4d0000 rsrc 62 not owned
Disable clock-controller@5ac90000 rsrc 102 not owned
Disable clock-controller@585a0000 rsrc 411 not owned

Starting kernel ...

[    0.000000] Booting Linux on physical CPU 0x0000000000 [0x410fd042]
[    0.000000] Linux version 5.10.72-6.bsp.imx8.rparz.aarch64 (mockbuild@6d5f04571492471aa042d7f13b0dea3e) (aarch64-linux-gnu-gcc (GCC) 8.4.1 20200928 (Red Hat Cross 8.4.1-13), GNU ld version 2.30-9.redpesk.toolchain.rparz) #1 SMP PREE2
[    0.000000] Machine model: Freescale i.MX8QXP MEK
Chaining Images
The above method works for a signer providing images to a run-time U-Boot. It is also possible to extend this scheme to a second level, like this:
- Master private key is used by the signer to sign a first-stage image.
- Master public key is placed in read-only memory.
- Secondary private key is created and used to sign second-stage images.
- Secondary public key is placed in first stage images
- We use the master public key to verify the first-stage image. We then use the secondary public key in the first-stage image to verify the second-state image.
- This chaining process can go on indefinitely. It is recommended to use a different key at each stage, so that a compromise in one place will not affect the whole change.
The procedure for signing is as follows:
- hash an image in the FIT
- sign the hash with a private key to produce a signature
- store the resulting signature in the FIT
The procedure for verification is:
- read the FIT
- obtain the public key
- extract the signature from the FIT
- hash the image from the FIT
- verify (with the public key) that the extracted signature matches the hash
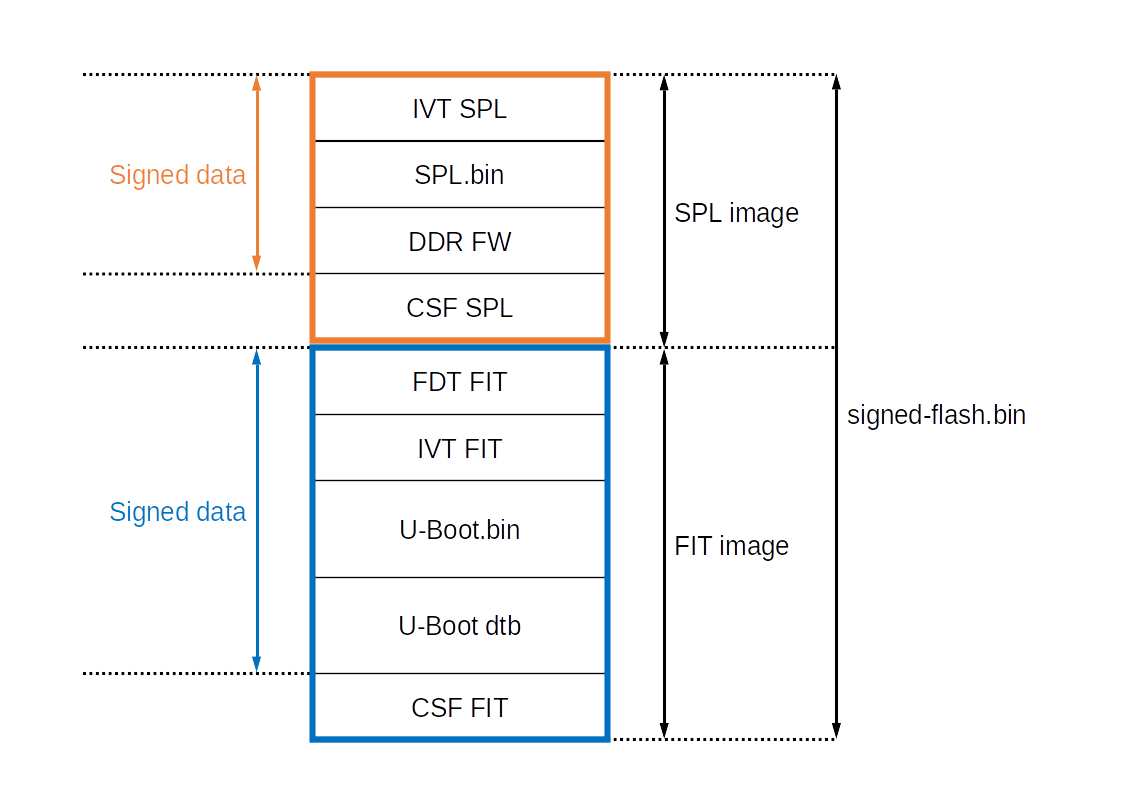
To sum up, this method results in the creation of the flash.bin as represented in the figure above.
Trusted Boot on the Nitrogen 8M Nano SBC
General concepts on the High Assurance Boot (HAB)
The High Assurance Boot (HAB) is developed by NXP for i.MX processors. It allows the verification of the digital signature of the bootloader and Linux kernel images before loading them. In practical terms, it is a software component included in ROM. When the processor is configured in Secure Boot mode, no unauthenticated code is allowed to execute. To achieve this, the HAB uses digital signatures to verify the authenticity and integrity of various software components, such as U-Boot, the Linux kernel, device-related firmware, etc. These signatures are used to ensure that the code has not been tampered with or modified by unauthorized third parties (e.g. an attacker).
This security mechanism uses asymmetric cryptography based on public and private key pairs, specifically RSA encryption, to authenticate the image executed at startup. The image data is signed offline by the image manufacturer (in this case, either somebody who is trusted or IoT.bzh) using private keys, and the i.MX processor verifies the signature using the corresponding public keys, which are loaded from a section of the binary (either U-Boot bootloader or Linux kernel to be verified).
The ROM and HAB cannot be modified and can thus be considered reliable software components. During startup, the HAB bootrom reads the eFuses to determine the security configuration of the SoC and the type of boot device. It then loads the SRK table from the Command Sequence File (CSF) section of the image, computes the hash value, and compares it to the value of SRK stored in the eFuses. If the values match, the secure boot process continues by verifying that the image is indeed correctly signed with the appropriate key.
In i.MX processors, the authentication begins with establishing a root of trust with the SRK. HAB does this by computing a cryptographic hash of the SRK table and comparing the result with a pre-computed hash that is provisioned in OTP fuses. This ensures that the integrity of the SRK table included in the image is intact.
So in our test phase, we implemented the hardware Secure Boot thanks to the OTP. Next we tried to chain with the Verified Boot from U-Boot to check the integrity of the entire bootflow until the rootfs.
Building the aarch64 image
The goal of this first part is to use a redpeskOS image on the Nitrogen 8M Nano. First of all, you need some prerequisites:
sudo apt-get install crossbuild-essential-arm64
export ARCH=arm64
export CROSS_COMPILE=aarch64-linux-gnu-
Then you can follow the official NXP documentation to build a U-boot 2022_04 bootloader.
git clone https://github.com/boundarydevices/u-boot.git -b boundary-v2022.04

wget https://www.nxp.com/lgfiles/NMG/MAD/YOCTO/firmware-imx-8.17.bin
chmod +x firmware-imx-8.17.bin
./firmware-imx-8.17.bin --auto-accept

cp firmware-imx-8.17/firmware/hdmi/cadence/signed_hdmi_imx8m.bin u-boot/
cp firmware-imx-8.17/firmware/ddr/synopsys/lpddr4*.bin u-boot/

cd u-boot
make nitrogen8_nano_sd_8mn1gr0_defconfig
make -j8
You should have all the uboot image combined in flash.bin which can be flashed on the SD_card:
sudo dd if=flash.bin of=/dev/sda bs=1024 seek=32; sync
Next change the boot switch hardware to 1100 in order to boot on the SD card. Boot it!
U-Boot SPL 2022.04-63560-g267082fb72 (Jun 13 2023 - 12:09:19 +0200)
config to do 3200 1d training.
config to do 400 1d training.
config to do 100 1d training.
config to do 3200 2d training.
Normal Boot
Trying to boot from MMC2
NOTICE:  BL31: v2.6(release):lf-5.15.32-2.0.0-4-g39ef123f7
NOTICE:  BL31: Built : 18:39:19, Jul  5 2022


U-Boot 2022.04-63560-g267082fb72 (Jun 13 2023 - 12:09:19 +0200)

CPU:   i.MX8MNano Quad rev1.0 at 1200 MHz
Reset cause: POR
Model: Boundary Devices i.MX8M Nano Nitrogen8_nano
Board: nitrogen8_nano
    Watchdog enabled
DRAM:  1 GiB
Core:  127 devices, 24 uclasses, devicetree: separate
MMC:   FSL_SDHC: 1, FSL_SDHC: 2
Loading Environment from MMC...
*** Warning - bad CRC, using default environment

Display: mipi:tm070jdhg30-1 (1280x800)
[*]-Video Link 0probe device is failed, ret -19
imx_sec_dsim dsi_controller@32e10000: get panel device error
mxs_video lcd-controller@32e00000: fail to attach bridge
probe video device failed, lcd-controller@32e00000 ret -19

        [0] lcd-controller@32e00000, video
        [1] dsi_controller@32e10000, video_bridge
        [2] panel@0, panel
probe device is failed, ret -19
imx_sec_dsim dsi_controller@32e10000: get panel device error
mxs_video lcd-controller@32e00000: fail to attach bridge
probe video device failed, lcd-controller@32e00000 ret -19
In:    serial
Out:   serial
Err:   serial

BuildInfo:
- ATF 39ef123

Net:   AR8035 at 4
FEC [PRIME], usb_ether
Hit any key to stop autoboot:  0
Without any things done on the Secure Boot aspects you should have secure issues:
=> hab_status

Secure boot disabled

HAB Configuration: 0xf0, HAB State: 0x66

--------- HAB Event 1 -----------------
event data:
        0xdb 0x00 0x08 0x45 0x33 0x11 0xcf 0x00

STS = HAB_FAILURE (0x33)
RSN = HAB_INV_CSF (0x11)
CTX = HAB_CTX_CSF (0xCF)
ENG = HAB_ENG_ANY (0x00)


--------- HAB Event 2 -----------------
event data:
        0xdb 0x00 0x14 0x45 0x33 0x0c 0xa0 0x00
        0x00 0x00 0x00 0x00 0x00 0x91 0x1f 0xc0
        0x00 0x00 0x00 0x20

STS = HAB_FAILURE (0x33)
RSN = HAB_INV_ASSERTION (0x0C)
CTX = HAB_CTX_ASSERT (0xA0)
ENG = HAB_ENG_ANY (0x00)


--------- HAB Event 3 -----------------
event data:
        0xdb 0x00 0x14 0x45 0x33 0x0c 0xa0 0x00
        0x00 0x00 0x00 0x00 0x00 0x91 0x1f 0xe0
        0x00 0x00 0x00 0x0c

STS = HAB_FAILURE (0x33)
RSN = HAB_INV_ASSERTION (0x0C)
CTX = HAB_CTX_ASSERT (0xA0)
ENG = HAB_ENG_ANY (0x00)


--------- HAB Event 4 -----------------
event data:
        0xdb 0x00 0x14 0x45 0x33 0x0c 0xa0 0x00
        0x00 0x00 0x00 0x00 0x00 0x91 0x20 0x00
        0x00 0x00 0x00 0x04

STS = HAB_FAILURE (0x33)
RSN = HAB_INV_ASSERTION (0x0C)
CTX = HAB_CTX_ASSERT (0xA0)
ENG = HAB_ENG_ANY (0x00)
Enabling secure boot on the nitrogen8_nano
First of all you have to download the Code Signing Tool package.
tar xvf cst-3.3.2.tar.gz
cd cst-3.3.2/keys
echo "123456789" > serial
# the tool requires the passphrase to be placed twice in the following file
echo "CA_passphrase" >  key_pass.txt
echo "CA_passphrase" >> key_pass.txt
./hab4_pki_tree.sh
Before generating the PKI tree, you may need to generate your own certificate:
openssl genpkey -algorithm RSA -out ca-pki-tree.key -pkeyopt rsa_keygen_bits:2048
openssl req -batch -new -x509 -key ca-pki-tree.key -out ca-pki-tree.crt
openssl rsa -pubout -in ca-pki-tree.key -out ca-pki-tree.pem
Then you have to use the NXP script which generates a PKI tree:
$ ./hab4_pki_tree.sh

+++++++++++++++++++++++++++++++++++++++++++++++++++++++++++++++
This script is a part of the Code signing tools for NXP's
High Assurance Boot.  It generates a basic PKI tree.  The PKI
tree consists of one or more Super Root Keys (SRK), with each
SRK having two subordinate keys:
    + a Command Sequence File (CSF) key
    + Image key.
Additional keys can be added to the PKI tree but a separate
script is available for this.  This this script assumes openssl
is installed on your system and is included in your search
path.  Finally, the private keys generated are password
protectedw ith the password provided by the file key_pass.txt.
The format of the file is the password repeated twice:
    my_password
    my_password
All private keys in the PKI tree are in PKCS #8 format will be
protected by the same password.

    +++++++++++++++++++++++++++++++++++++++++++++++++++++++++++++++
Do you want to use an existing CA key (y/n)?: n
Key type options (confirm targeted device supports desired key type):
Select the key type (possible values: rsa, rsa-pss, ecc)?: rsa
Enter key length in bits for PKI tree: 2048
Enter PKI tree duration (years): 20
How many Super Root Keys should be generated? 4
Do you want the SRK certificates to have the CA flag set? (y/n)?: y
git clone https://github.com/nxp-imx/imx-mkimage.git -b lf-5.10.72_2.2.0
$ hexdump -e '/4 "0x"' -e '/4 "%X""\n"' SRK_1_2_3_4_fuse.bin
0xDF785770
0x6BD1A318
0x4F3A2E0F
0x66B421AC
0x8984D686
0x8B6E4177
0x3D1A0FE
0x31B6F7AD
=> fuse prog 6 1 0x6BD1A318
Programming bank 6 word 0x00000001 to 0x6bd1a318...
Warning: Programming fuses is an irreversible operation!
        This may brick your system.
        Use this command only if you are sure of what you are doing!

Really perform this fuse programming? <y/N>
y
=> fuse read 6 1
Reading bank 6:

Word 0x00000001: 00000000
After rebooting:
=> fuse read 6 1
Reading bank 6:

Word 0x00000001: 6bd1a318
https://github.com/nxp-imx/imx-mkimage.git
cd imx-mkimage
# retrieving U-boot binaries to the needed repo
cp ../u-boot/u-boot.bin iMX8M/
cp ../u-boot/u-boot-nodtb.bin iMX8M/
cp ../u-boot/spl/u-boot-spl.bin iMX8M/
cp ../u-boot/arch/arm/dts/imx8mn-nitrogen8_nano.dtb iMX8M/
# retrieving ARM trusted firmware
cd ..
git clone https://github.com/nxp-imx/imx-atf.git
cd imx-atf/
make PLAT=imx8mn bl31
cd ../imx-mkimage/
cp ~/nitrogen_nano/u-boot_14_06/imx-atf/build/imx8mn/release/bl31.bin iMX8M/
# retrieving NXP memory firmwares
cd ..
wget https://www.nxp.com/lgfiles/NMG/MAD/YOCTO/firmware-imx-8.0.bin
chmod 777 firmware-imx-8.0.bin
./firmware-imx-8.0.bin --auto-accept
cp ../firmware-imx-8.0/firmware/ddr/synopsys/lpddr4_pmu_train_1d_dmem.bin iMX8M/
cp ../firmware-imx-8.0/firmware/ddr/synopsys/lpddr4_pmu_train_1d_imem.bin iMX8M/
cp ../firmware-imx-8.0/firmware/ddr/synopsys/lpddr4_pmu_train_2d_dmem.bin iMX8M/
cp ../firmware-imx-8.0/firmware/ddr/synopsys/lpddr4_pmu_train_2d_imem.bin iMX8M/

make clean
make SOC=iMX8MN flash_evk
$ cp ../uboot-imx/tools/mkimage iMX8M/mkimage_uboot
$ make SOC=iMX8MN flash_evk

make SOC=iMX8MN flash_evk
./../scripts/dtb_check.sh imx8mn-evk.dtb evk.dtb
Use u-boot DTB: imx8mn-evk.dtb
./../scripts/pad_image.sh tee.bin
Pad file tee.bin NOT found
./../scripts/pad_image.sh bl31.bin
./../scripts/pad_image.sh u-boot-nodtb.bin evk.dtb
u-boot-nodtb.bin + evk.dtb are padded to 901216
DEK_BLOB_LOAD_ADDR=0x40400000 TEE_LOAD_ADDR=0x56000000 ATF_LOAD_ADDR=0x00960000 ./mkimage_fit_atf.sh evk.dtb > u-boot.its
bl31.bin size:
41168
u-boot-nodtb.bin size:
844248
evk.dtb size:
56968
./mkimage_uboot -E -p 0x3000 -f u-boot.its u-boot.itb
FIT description: Configuration to load ATF before U-Boot
Created:         Thu Jun 15 17:24:19 2023
Image 0 (uboot-1)
Description:  U-Boot (64-bit)
Created:      Thu Jun 15 17:24:19 2023
Type:         Standalone Program
Compression:  uncompressed
Data Size:    844248 Bytes = 824.46 KiB = 0.81 MiB
Architecture: AArch64
Load Address: 0x40200000
Entry Point:  unavailable
Image 1 (fdt-1)
Description:  evk
Created:      Thu Jun 15 17:24:19 2023
Type:         Flat Device Tree
Compression:  uncompressed
Data Size:    56968 Bytes = 55.63 KiB = 0.05 MiB
Architecture: Unknown Architecture
Image 2 (atf-1)
Description:  ARM Trusted Firmware
Created:      Thu Jun 15 17:24:19 2023
Type:         Firmware
Compression:  uncompressed
Data Size:    41168 Bytes = 40.20 KiB = 0.04 MiB
Architecture: AArch64
OS:           Unknown OS
Load Address: 0x00960000
Default Configuration: 'config-1'
Configuration 0 (config-1)
Description:  evk
Kernel:       unavailable
Firmware:     uboot-1
FDT:          fdt-1
Loadables:    atf-1
./mkimage_imx8 -version v2 -fit -loader u-boot-spl-ddr.bin 0x912000 -second_loader u-boot.itb 0x40200000 0x60000 -out flash.bin
Platform:       i.MX8M (mScale)
ROM VERSION:    v2
Using FIT image
LOADER IMAGE:   u-boot-spl-ddr.bin start addr: 0x00912000
SECOND LOADER IMAGE:    u-boot.itb start addr: 0x40200000 offset: 0x00060000
Output:         flash.bin
========= IVT HEADER [HDMI FW] =========
header.tag:             0x0
header.length:          0x0
header.version:         0x0
entry:                  0x0
reserved1:              0x0
dcd_ptr:                0x0
boot_data_ptr:          0x0
self:                   0x0
csf:                    0x0
reserved2:              0x0
boot_data.start:        0x0
boot_data.size:         0x0
boot_data.plugin:       0x0
========= IVT HEADER [PLUGIN] =========
header.tag:             0x0
header.length:          0x0
header.version:         0x0
entry:                  0x0
reserved1:              0x0
dcd_ptr:                0x0
boot_data_ptr:          0x0
self:                   0x0
csf:                    0x0
reserved2:              0x0
boot_data.start:        0x0
boot_data.size:         0x0
boot_data.plugin:       0x0
========= IVT HEADER [LOADER IMAGE] =========
header.tag:             0xd1
header.length:          0x2000
header.version:         0x41
entry:                  0x912000
reserved1:              0x0
dcd_ptr:                0x0
boot_data_ptr:          0x911fe0
self:                   0x911fc0
csf:                    0x9421c0
reserved2:              0x0
boot_data.start:        0x911fc0
boot_data.size:         0x32260
boot_data.plugin:       0x0
========= OFFSET dump =========
Loader IMAGE:
header_image_off       0x0
dcd_off                0x0
image_off              0x40
csf_off                0x30200
spl hab block:         0x911fc0 0x0 0x30200

Second Loader IMAGE:
sld_header_off         0x58000
sld_csf_off            0x59020
sld hab block:         0x401fcdc0 0x58000 0x1020
The build log provided by imx-mkimage can be used to define the "Authenticate Data" parameter in Code Signing Files.
make SOC=iMX8MN print_fit_hab
./../scripts/dtb_check.sh imx8mn-evk.dtb evk.dtb
Use u-boot DTB: imx8mn-evk.dtb
./../scripts/pad_image.sh tee.bin
Pad file tee.bin NOT found
./../scripts/pad_image.sh bl31.bin
./../scripts/pad_image.sh u-boot-nodtb.bin evk.dtb
u-boot-nodtb.bin + evk.dtb are padded to 901216
TEE_LOAD_ADDR=0x56000000 ATF_LOAD_ADDR=0x00960000 VERSION=v2 ./print_fit_hab.sh 0x60000 evk.dtb
0x40200000 0x5B000 0xCE1D8
0x402CE1D8 0x1291D8 0xDE88
0x960000 0x137060 0xA0D0
The CSF contains all the commands that the ROM executes during the secure boot. These commands instruct the HAB code on which memory areas of the image to authenticate, which keys to install, use etc. Here is an example of both CST files. The offsets are previous data from mk-image and print_hab command.
$ cat csf_spl.txt
[Header]
    Version = 4.5
    Hash Algorithm = sha256
    Engine = CAAM
    Engine Configuration = 0
    Certificate Format = X509
    Signature Format = CMS

[Install SRK]
    # Index of the key location in the SRK table to be installed
    File = "crts/SRK_1_2_3_4_table.bin"
    Source index = 0

[Install CSFK]
    # Key used to authenticate the CSF data
    File = "crts/CSF1_1_sha256_2048_65537_v3_usr_crt.pem"

[Authenticate CSF]

[Unlock]
    # Leave Job Ring and DECO master ID registers Unlocked
    Engine = CAAM
    Features = MID

[Install Key]
    # Key slot index used to authenticate the key to be installed
    Verification index = 0
    # Target key slot in HAB key store where key will be installed
    Target index = 2
    # Key to install
    File = "crts/IMG1_1_sha256_2048_65537_v3_usr_crt.pem"

[Authenticate Data]
    # Key slot index used to authenticate the image data
    Verification index = 2
    # Authenticate Start Address, Offset, Length and file
    Blocks = 0x911fc0 0x0 0x30200 "flash.bin"


$ cat csf_fit.txt
[Header]
    Version = 4.5
    Hash Algorithm = sha256
    Engine = CAAM
    Engine Configuration = 0
    Certificate Format = X509
    Signature Format = CMS

[Install SRK]
    # Index of the key location in the SRK table to be installed
    File = "crts/SRK_1_2_3_4_table.bin"
    Source index = 0

[Install CSFK]
    # Key used to authenticate the CSF data
    File = "crts/CSF1_1_sha256_2048_65537_v3_usr_crt.pem"

[Authenticate CSF]

[Install Key]
    # Key slot index used to authenticate the key to be installed
    Verification index = 0
    # Target key slot in HAB key store where key will be installed
    Target index = 2
    # Key to install
    File = "crts/IMG1_1_sha256_2048_65537_v3_usr_crt.pem"

[Authenticate Data]
    # Key slot index used to authenticate the image data
    Verification index = 2
    # Authenticate Start Address, Offset, Length and file
    Blocks =  0x401fcdc0 0x58000 0x1020 "flash.bin", \
            0x40200000 0x5B000 0xCE1D8 "flash.bin", \
            0x402CE1D8 0x1291D8 0xBD18 "flash.bin", \
            0x960000 0x134EF0 0xA0D0 "flash.bin"
$ cp ../imx-mkimage/iMX8M/flash.bin .
$ ../cst-3.3.2/linux64/bin/cst -i csf_spl.txt -o csf_spl.bin
CSF Processed successfully and signed data available in csf_spl.bin
$ ../cst-3.3.2/linux64/bin/cst -i csf_fit.txt -o csf_fit.bin
CSF Processed successfully and signed data available in csf_fit.bin
The last step is to create the final flash.bin:
dd if=../cst-3.3.2/csf_spl.bin of=signed_flash.bin seek=$((0x30200)) bs=1 conv=notrunc
dd if=../cst-3.3.2/csf_fit.bin of=signed_flash.bin seek=$((0x59020)) bs=1 conv=notrunc
sudo dd if=signed_flash.bin of=/dev/sda bs=1024 seek=32 && sync
Completed trustchain with Verified Boot
Then to complete the chain is the addition of what we did with the Verified Boot:
$ cp imx8mn-nitrogen8_nano.dtb imx8mn-nitrogen8-nano-with-pubkey.dtb
$ ../tools/mkimage -f fitImage-signed-conf.its -K imx8mn-nitrogen8-nano-with-pubkey.dtb -k keys -r fitImage
FIT description: fitImage signed for the redpesk image
Created:         Fri Jun 16 13:54:24 2023
Image 0 (kernel)
Description:  redpesk i.MX8mn nitrogen nano based on Linux kernel 5.4
Created:      Fri Jun 16 13:54:24 2023
Type:         Kernel Image
Compression:  uncompressed
Data Size:    29614592 Bytes = 28920.50 KiB = 28.24 MiB
Architecture: AArch64
OS:           Linux
Load Address: 0x80280000
Entry Point:  0x80280000
Hash algo:    sha256
Hash value:   53b03ca799982fe1cf3122734b5483ad18bdc74ed3060193a2074df241b6ae16
Image 1 (fdt)
Description:  Flattened Device Tree blob
Created:      Fri Jun 16 13:54:24 2023
Type:         Flat Device Tree
Compression:  uncompressed
Data Size:    48408 Bytes = 47.27 KiB = 0.05 MiB
Architecture: AArch64
Load Address: 0x83000000
Hash algo:    sha256
Hash value:   4998c17de2b6e41ec68b6db669e8df12674a61632d3d10a66131569236b03fcf
Default Configuration: 'conf'
Configuration 0 (conf)
Description:  configuration 1 (Kernel & dtb)
Kernel:       kernel
FDT:          fdt
Sign algo:    sha256,rsa4096:dev-redpesk
Sign value:   93c2bd919d7cddfd5404f47e885e74ed1c34e14418e80556fe6661690b28ed33c2eddc56696f8694334610de455a2a7845891ce1a8e99ee4a93781128f77ff68a9cf8372a752edb1ad548721c078bd6f3dbc6a6b452ebed7739acc5cd132ce68d1e4402dd79af4911668b0cd7bdff80dd9debda8744e8856ec2b8ffc069ed9b0e7f644ac258372af4d1284c6519dc9df37a6ed534e7297dd2e762bdd77eff70791d4af4cc9dc16832797f2ba0da7b801156bfaee9b12d67a1eaff5d391b9ae13d210993af15463020866d3a26e7936ea78f486f9bfac81e5649a6b205fb3440a01d1af120e9b2881cc166a1cfea35280878510cd81e989e1537722bb4f46c2f2
Timestamp:    Fri Jun 16 13:54:24 2023
Signature written to 'fitImage', node '/configurations/conf/signature'
Public key written to 'imx8mn-nitrogen8-nano-with-pubkey.dtb', node '/signature/key-dev-redpesk'
U-Boot SPL 2022.04-63560-g267082fb72 (Jun 16 2023 - 16:06:47 +0200)
config to do 3200 1d training.
config to do 400 1d training.
config to do 100 1d training.
config to do 3200 2d training.
Normal Boot
Trying to boot from MMC2
hab fuse enabled

Authenticate image from DDR location 0x401fcdc0...
NOTICE:  BL31: v2.6(release):lf-5.15.32-2.0.0-4-g39ef123f7
NOTICE:  BL31: Built : 18:39:19, Jul  5 2022


U-Boot 2022.04-63560-g267082fb72 (Jun 16 2023 - 16:06:47 +0200)

CPU:   i.MX8MNano Quad rev1.0 at 1200 MHz
Reset cause: POR
Model: Boundary Devices i.MX8M Nano Nitrogen8_nano
Board: nitrogen8_nano
    Watchdog enabled
DRAM:  1 GiB
Core:  129 devices, 25 uclasses, devicetree: separate
MMC:   FSL_SDHC: 1, FSL_SDHC: 2
Loading Environment from MMC...
*** Warning - bad CRC, using default environment

Display: mipi:tm070jdhg30-1 (1280x800)
[*]-Video Link 0probe device is failed, ret -19
imx_sec_dsim dsi_controller@32e10000: get panel device error
mxs_video lcd-controller@32e00000: fail to attach bridge
probe video device failed, lcd-controller@32e00000 ret -19

        [0] lcd-controller@32e00000, video
        [1] dsi_controller@32e10000, video_bridge
        [2] panel@0, panel
probe device is failed, ret -19
imx_sec_dsim dsi_controller@32e10000: get panel device error
mxs_video lcd-controller@32e00000: fail to attach bridge
probe video device failed, lcd-controller@32e00000 ret -19
In:    serial
Out:   serial
Err:   serial
SEC0:  RNG instantiated

BuildInfo:
- ATF 39ef123

Net:   AR8035 at 4
FEC [PRIME], usb_ether
Hit any key to stop autoboot:  0
=> hab_status

Secure boot enabled
Finally close the configuration with the SRK_LOCK eFuse.
Sources: